Photogrammetry
In this video series you will learn how to use photogrammetry to scan real objects and create 3d models to be shared on the web and in augmented reality.
[1/7] Introduction
Photogrammetry is a survey technique that allows you to acquire metric data of an object through image analysis.
You will use common hardware such as your smartphone or a camera to acquire the photos and process them with available software such as Metashape and Blender.
You will finally publish them with My AR Studio to make them available on the web and in augmented reality.
We will need:
- A camera or smartphone to photograph the object
- Optionally an automated shooting app such as Phototimer+
- A photogrammetry software such as Metashape to generate the model
- A 3d modeling software such as Blender to correct the model
- An image editor such as Photoshop to correct the texture
- An account on My AR Studio
[2/7] Taking the pictures
The photographic set
To properly take photographs of our object we will need:
-
a smartphone or a camera.
-
a marker (if you don't have one ready you can download one by clicking the button) Download the marker
-
an object to photograph, the important thing is that it is opaque. In fact, models of shiny or reflective objects cannot be reliably generated.
-
a support to hold the object raised.
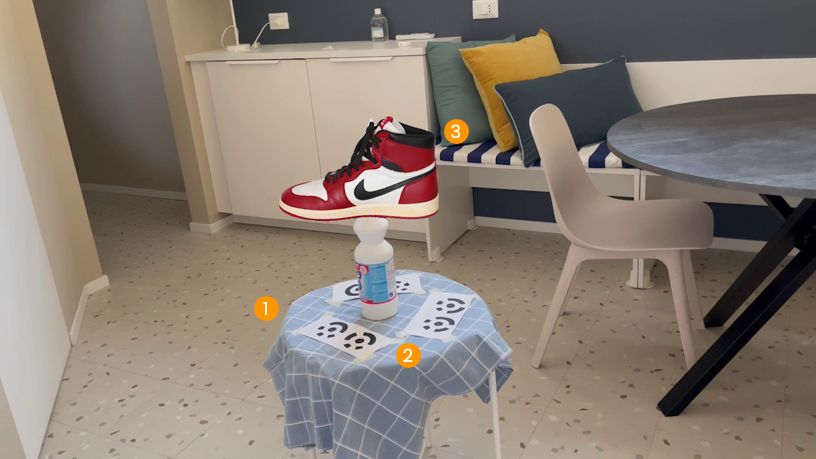
We choose an environment with a soft light and arrange the markers 1, positioning them so as to leave the necessary space for the object in the center.
We measure and note the distance between the markers 2, we will need it later, and then we position the object in the center 3.
Take the pictures
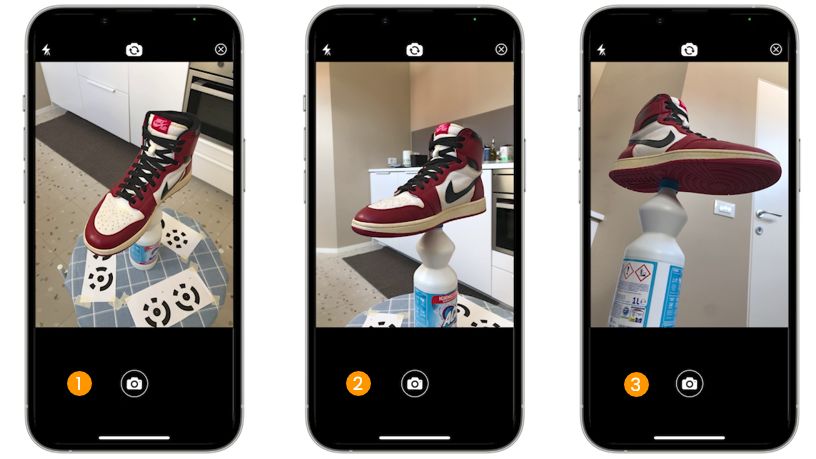
We use our camera or smartphone to take photos. If we use an iphone, we download and open Phototimer+. We then set the number of photos to 40 and press take photos.
We take: 40 photos from above 1, 40 photos in the center 2, 40 photos from below 3.
[3/7] Generating the model
Generating the Point Cloud
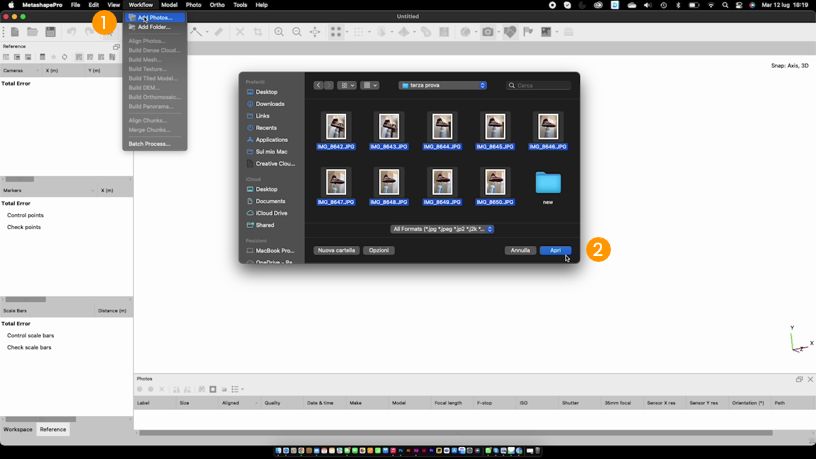
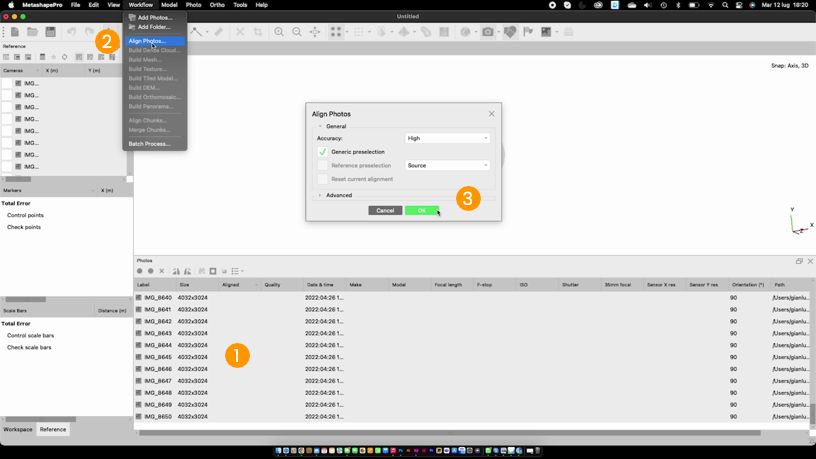
Let's open Metashape and go to Workflow > Add Photos 1. We select the photos, previously taken, with SHIFT + left mouse button and then click Open 2.
From the menu below we select all the photos 1, then click Workflow > Align Photos 2. We keep the standard parameters 3 and click OK. At the end of the process we will find ourselves with a preliminary point cloud of our object.
Refining the Point Cloud
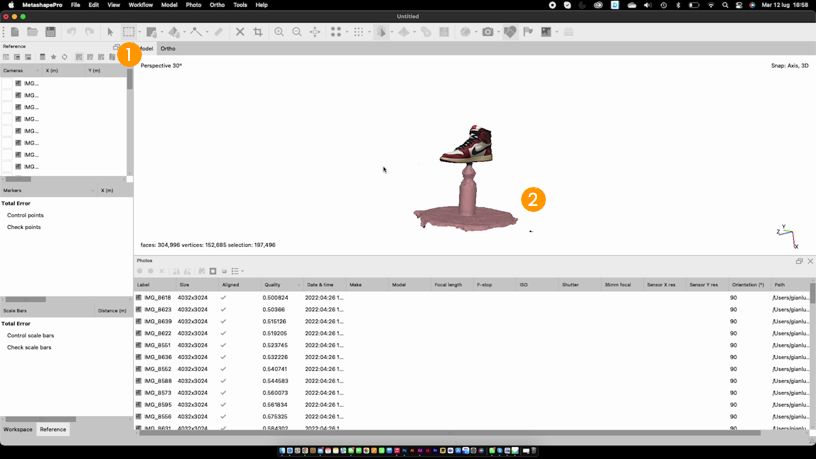
We click on the Camera Icon 1 to hide the photos. We then use the Selection Tool 2 to select the unwanted points 3 and delete them by pressing DELETE. We continue like this until we narrow the field around our object.

Now let's right click on a photo, select Estimate Image Quality 1, we then select All Cameras 2 and OK. We then delete all the photos of less than 0.5 quality 3, in order to obtain a quality scan.

Scaling the scan
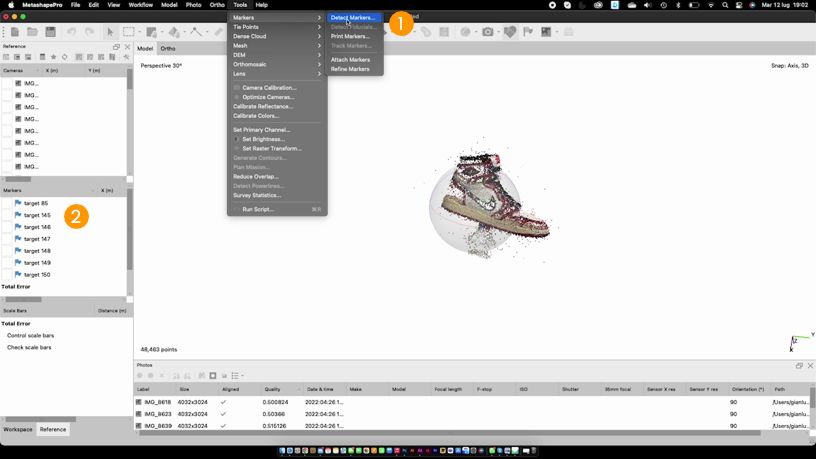
Now we go to Tools > Markers > Detect Markers 1, and click OK. The markers will then be detected and shown on the left menu 2.
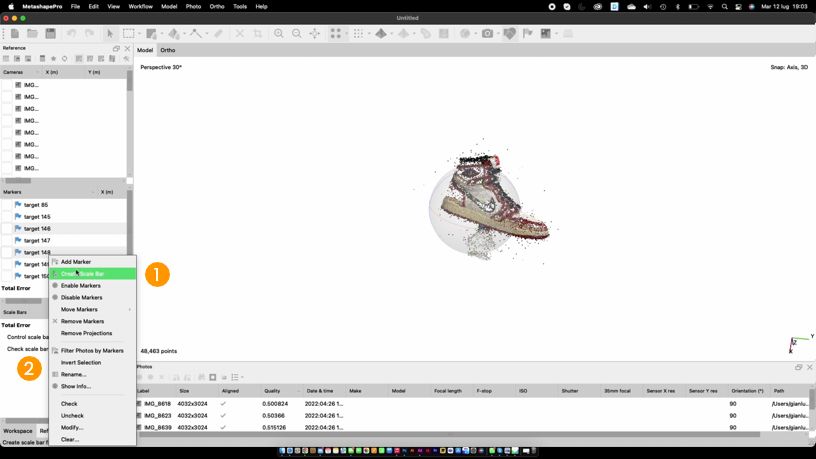
We now retrieve the distance data between the markers measured in the previous tutorial. We select a pair of markers, right click > Create Scale Bar 1 and assign the measured value. We repeat the operation for the remaining markers and click Check Scale Bar 2. The model will then be scaled to its actual size.
Generating the mesh
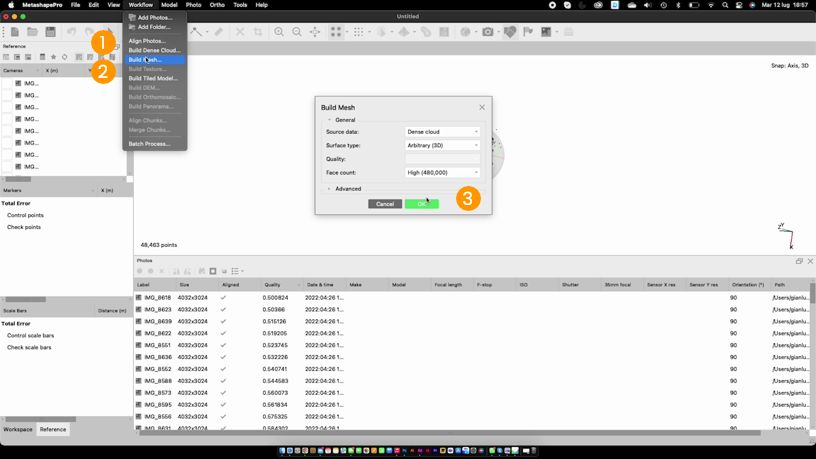
We increase the definition of the Point Cloud by clicking on Workflow > Build Dense Cloud 1 and clicking OK. Then we generate the mesh by clicking on Workflow > Build Mesh 2 and clicking OK 3.
Now let's go back to the Selection Tool 1, and eliminate the excesses 2 by pressing DELETE.
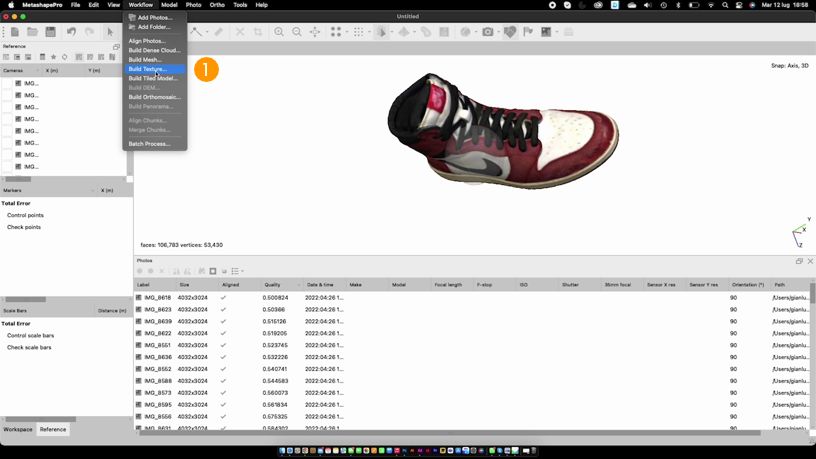
Finally, click on Workflow > Build Texture 1. In this way we have obtained our model, almost definitive. The details are realistic but we still need some editing to finish the surfaces.
Exporting the model
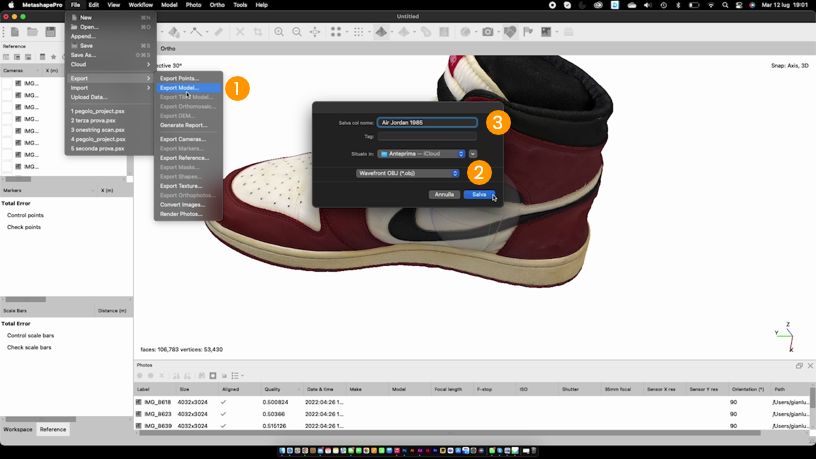
Click on Export> Export Model 1. Let's make sure that the selected format is obj 2. Let's assign a name 3. We choose the format for the texture between jpg and png, and confirm the export.
[4/7] Importing the 3d scan into Blender
Importing the scan
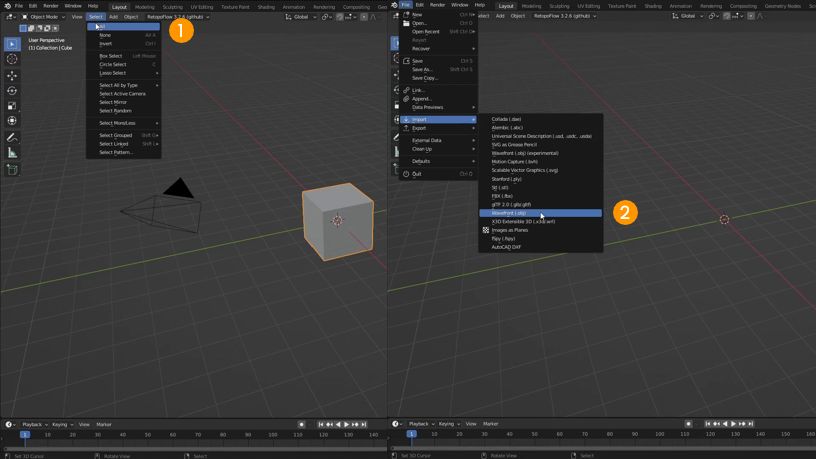
Let's open Blender and delete the objects present in the default scene. We click the Select > All menu 1 and press DEL on the keyboard. We then click the File > Import > Wavefront (.obj) 2 menu and import the scan file.
The 3d view
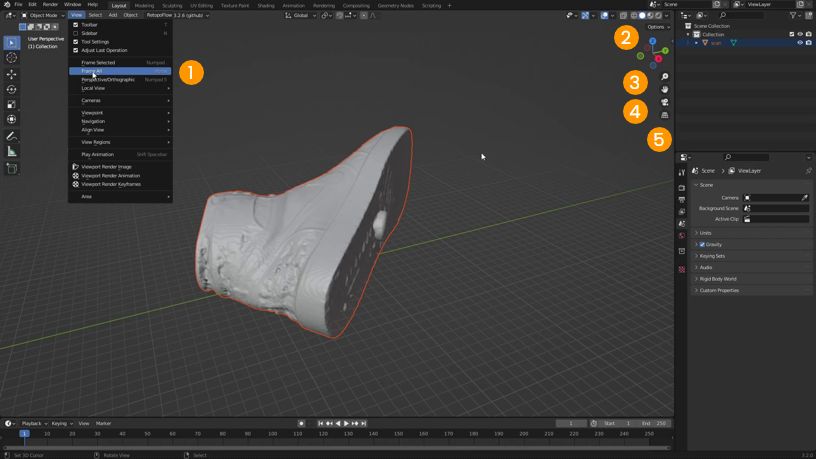
If the object is imported outside the current view, we just click the View > Frame All 1 menu to show it.
To move in 3d space we can use the gizmos on the right side of the view:
- the Cross 2 rotates the view and, by clicking on the dots, aligns it to the axes
- the Lens 3 enlarges the view
- the Hand 4 moves the view
- the Grid 5 switches to the orthogonal view
Aligning the object
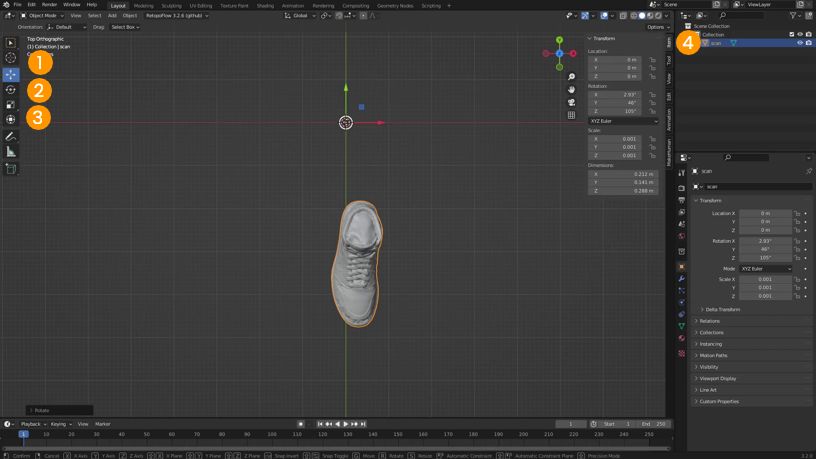
The shoe scan is not oriented correctly and is displaced from the center of the axes. We also see that the shoe size is off scale.
We use the Move 1, Rotate 2 and Scale 3 tools to position it correctly.
By clicking on the small arrow on the right edge of the 3D window we will open the Coordinates Panel 4. By setting the coordinates numerically we will be able to position the shoe with much more precision.
Material setup
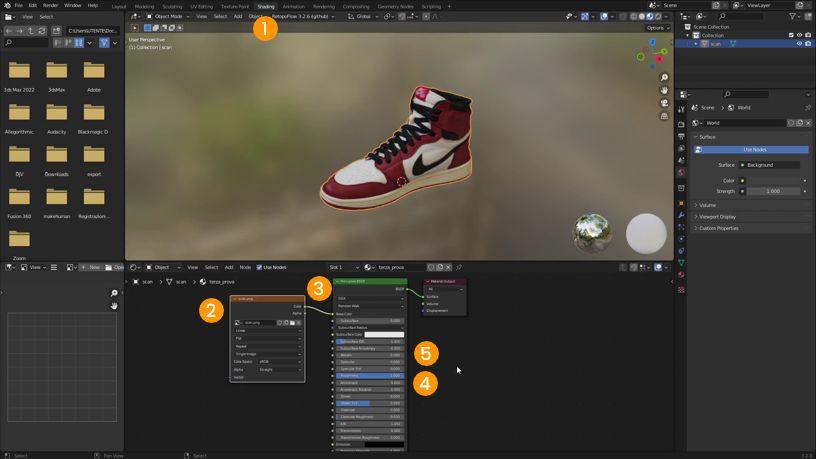
We click on the Shading Tab 1 to set the shoe material.
We drag the shoe texture file into the Node Editor 2 and link it 3 to the material node.
We set the following parameters on the material node:
- roughness at 1 4
- specular at 0 5
Saving the blend file
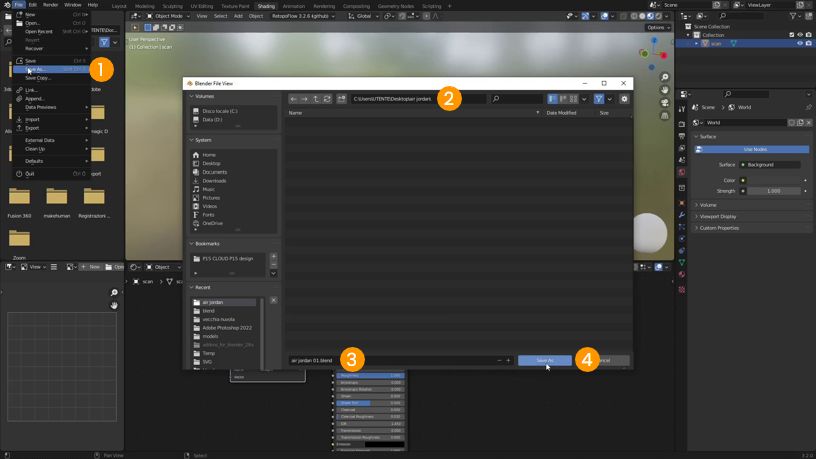
Now that the shoe has been set up correctly we can save it. We click on the menu File > Save As 1. We select the save folder 2, set "air jordan 01" as file name 3 and click SAVE AS 4.
[5/7] Correcting the scan
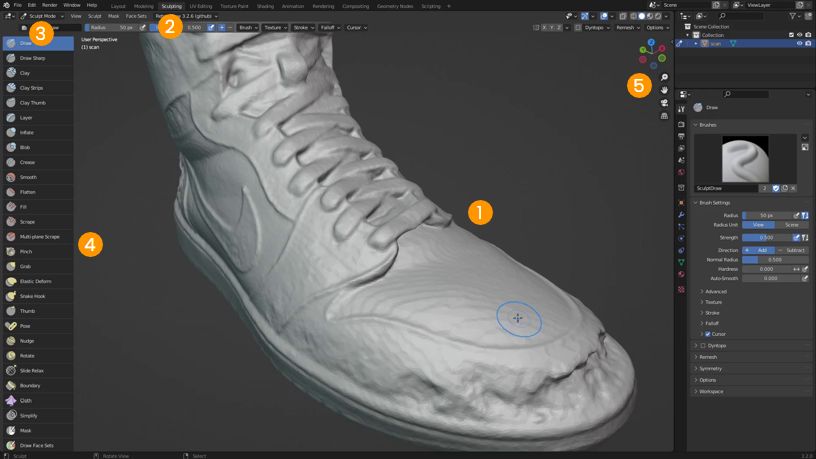
Sculpt mode
In this tutorial we will see how to correct model scan errors using blender's sculpting features.
To enter sculpt mode, we select the shoe 1 and click on the Sculpting Tab 2. If we were to leave the sculpt mode by mistake, we would just re-select the shoe and choose Sculpt Mode from the interaction mode selection menu 3.
We widen the Toolbar 4 containing all the sculpting brushes. Seeing their names will make it easier to use them.
In the previous tutorial we saw how to use the 3d view navigation gizmos 5. In this tutorial we will use the mouse and keyboard in this way:
- pressing the mouse wheel will rotate the view
- pressing SHIFT together with the mouse wheel will move the view
- rolling the mouse wheel will enlarge the view
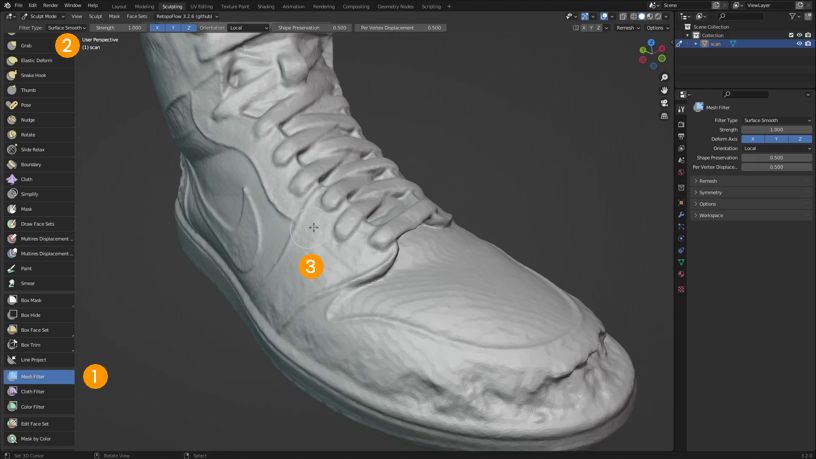
Cleaning up the noise
First we're going to fix the banded noise created by the scan. Let's scroll through the list of brushes and activate Mesh Filter 1. From the top menu we select the Surface Smooth filter 2.
We click on any point of the 3d view and drag to the right 3. The more we drag the more the filter will clean up the noise.
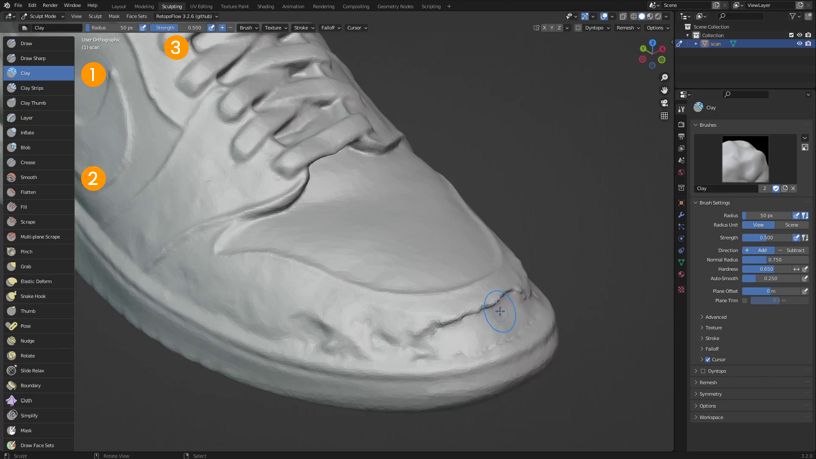
Filling in the hollows
To fill in the "eaten" parts of the shoe we will use the Clay Brush 1 as follows:
- By clicking and dragging the mouse we will fill the hollows
- Holding down CTRL while painting will remove material
- Pressing SHIFT while painting will smooth the surface
Alternatively, to smooth the surface, we can directly use the Smooth Brush 2. Also, by varying the strength 3 parameter, we will adjust the effect of each brush.
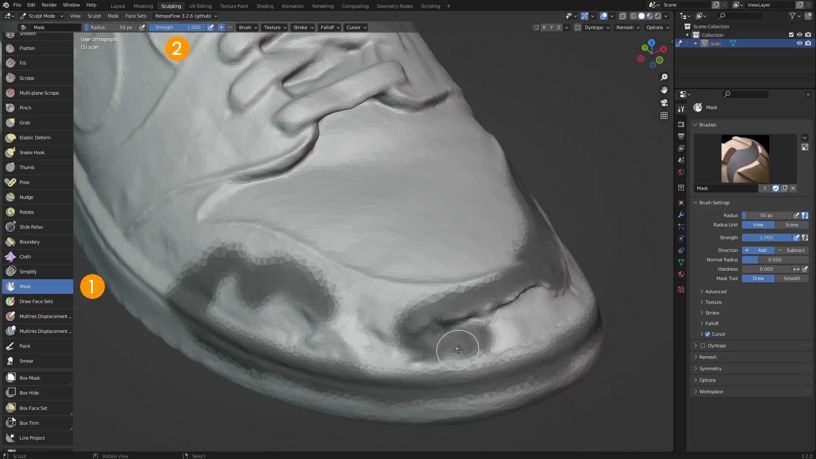
Protecting the surface
To protect parts of the shoe that we do not want to modify we will use the Mask Brush 1. We increase the strength 2 of the brush to 1 for maximum protection and proceed as follows:
- By clicking and dragging the mouse we will paint the protective mask
- Holding down CTRL while painting will erase the mask
- Pressing SHIFT while painting will blur the mask
After cleaning the model we will go to save a new file by clicking on the File > SAve As menu.
[6/7] Correcting the texture
Removing the stains
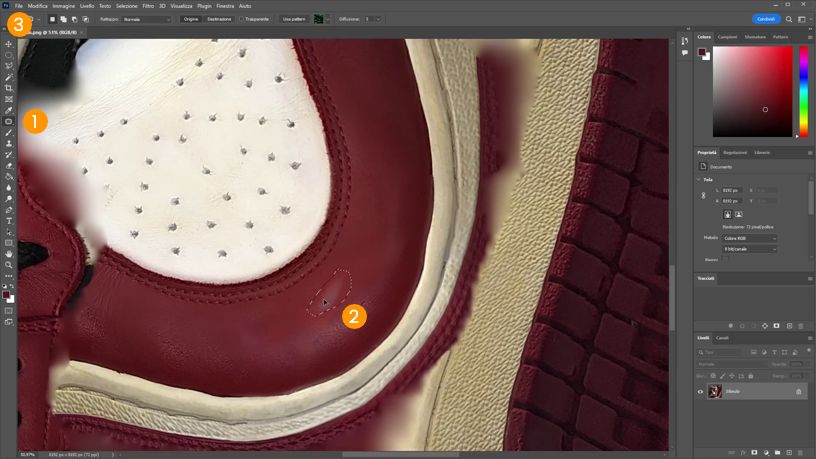
Let's open the shoe texture in Photoshop. We use the Patch Tool 1 to erase the stains like this:
- we select the area that contains a stain 2
- we drag the selection to a clean point of the shoe
We repeat the operation until we eliminate a good number of stains. Let's save a new file by clicking on the File > Save As 3 menu.
Checking the result
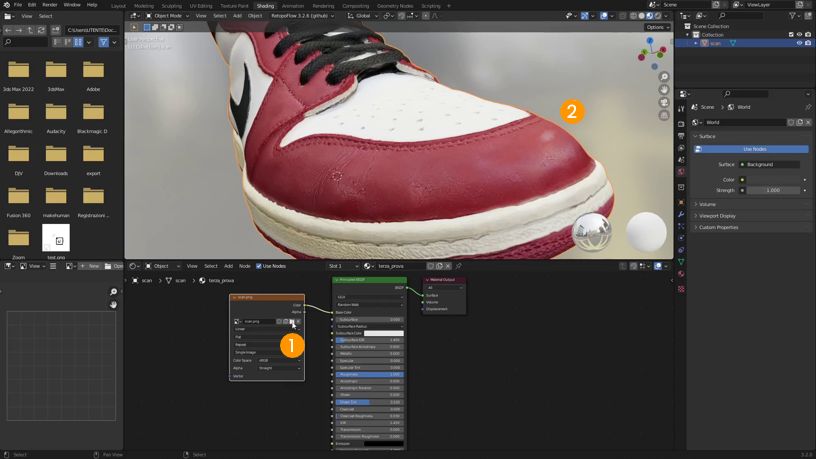
In Blender, we click on the folder icon 1 of the texture node of the shoe material. We load the image we have just saved and check the result on the model 2.
We will repeat the operation every time we want to check the progress of the work.
Covering the support
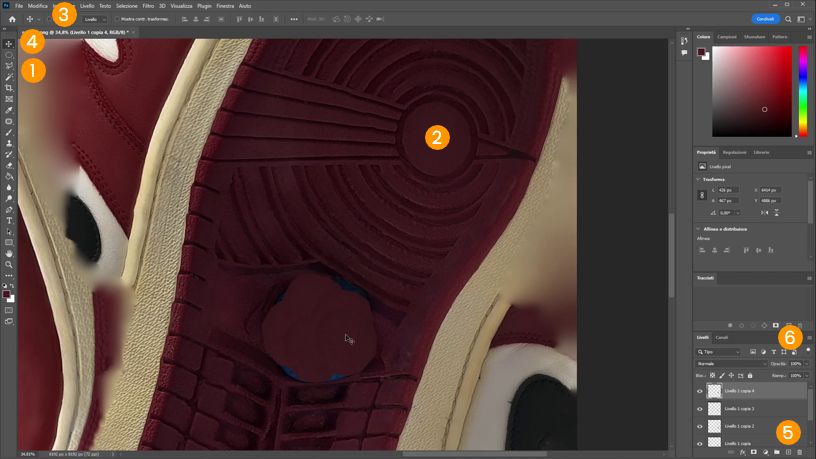
Using the Lasso Tool 1 we select a piece of sole 2. Let's duplicate it in a new layer by clicking on the Edit > Copy and Edit > Paste menu 3. Let's move the new layer on top of the support using the Move Tool 4.
Duplicate the layer by dragging it on the Add Layer icon 5 of the layers panel. We move it to better cover the support and repeat the operation as long as necessary. From the layer panel menu we choose Merge Visible 6 to merge together all the layers we have created.
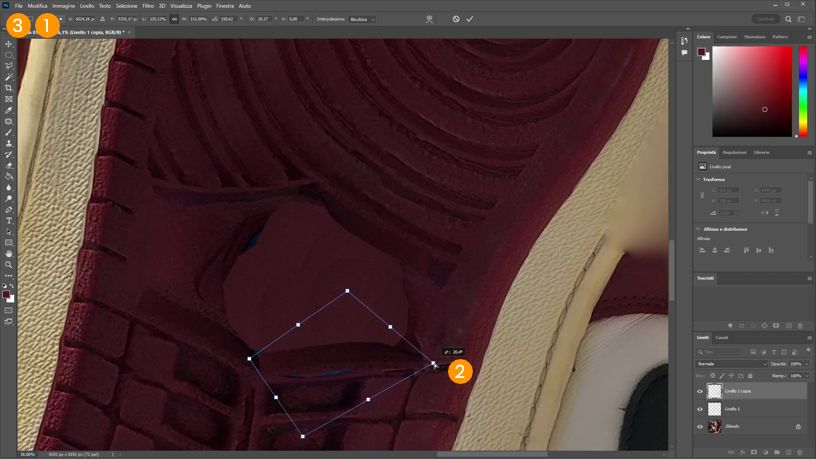
We select and duplicate another piece of sole. We click on the Edit > Free Transform menu 1 and position the layer to cover one side of the support. If necessary we can deform the layer by holding down CTRL while moving the control points 2. We repeat the operation as long as necessary.
We merge the layers and with the Patch Tool we finish the edges of the area. We overwrite the image by clicking on the File > Save menu 3.
Finally in Blender we reload the texture image and save a new file by clicking on the File > Save As menu.
[7/7] Exporting for My AR Studio
To export a GLB file optimized for My AR Studio we will modify both the texture and the model of the shoe. The aim is to make the file weigh as little as possible while maintaining the highest quality of the final result.
Optimizing the texture
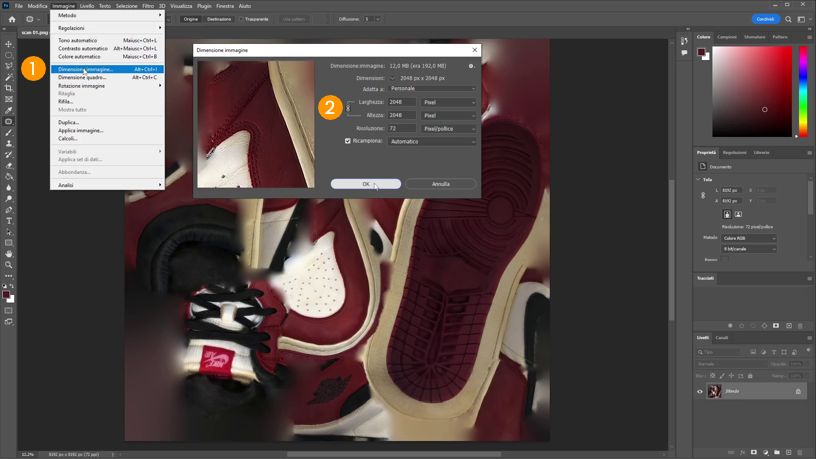
Let's open the texture in Photoshop. We click on the menu Image > Image Size 1 and set the new size to 2048 pixels 2.
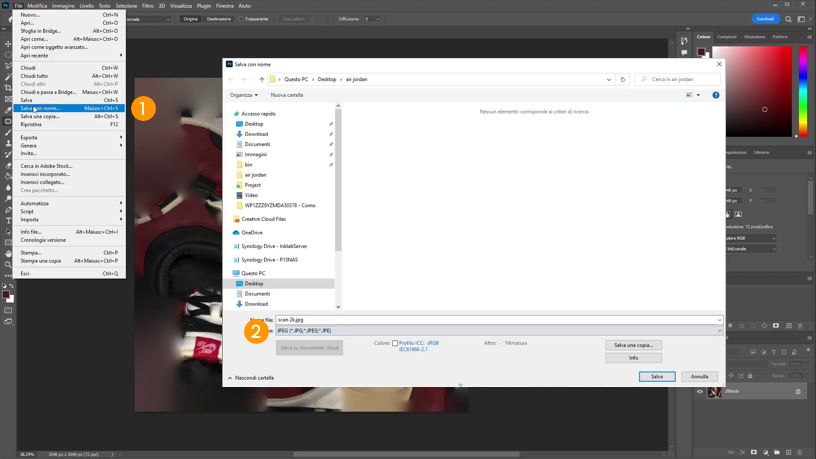
We click on the File > Save As 1 menu and save a new copy of the texture by choosing the jpg format 2.
Optimizing the model
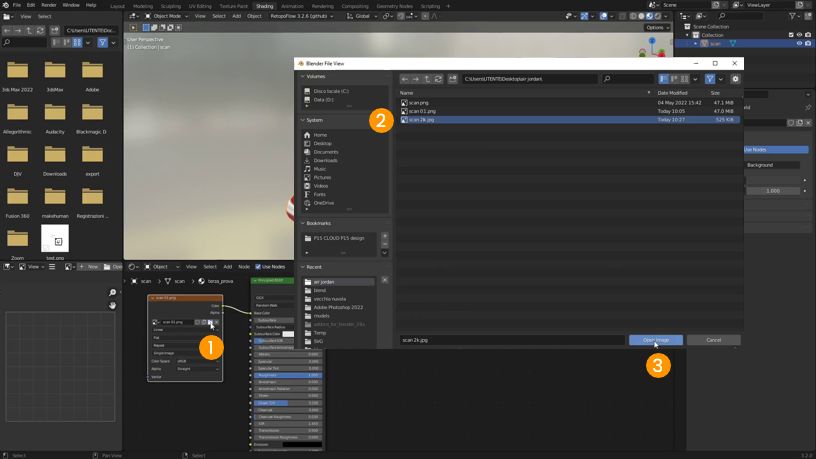
We open the shoe in Blender and click the folder icon 1 on the material texture node. Then we select the image just saved 2 and load it 3.
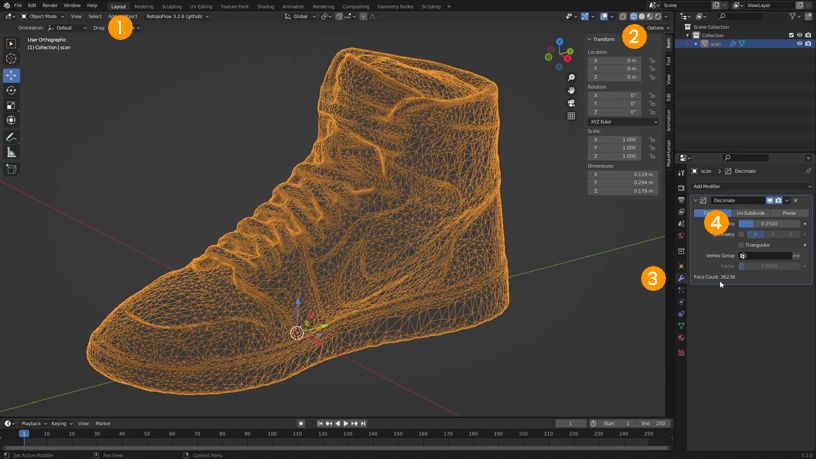
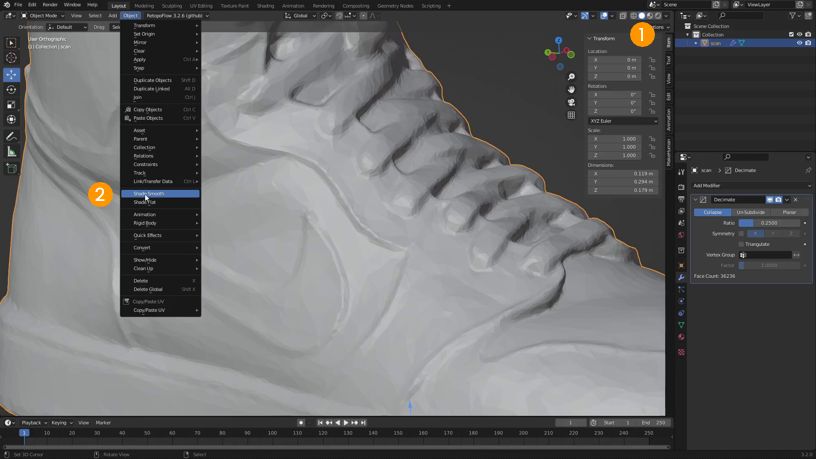
Click on the Layout Tab 1 and activate Wireframe mode 2. With the shoe selected we add a Decimate Modifier 3. We decrease the Ratio value to 0.25 4 to reduce the number of polygons.
We activate the Solid mode 1 and notice that we see the edges of the polygons. We click on the menu Object > Shade Smooth 2 to set a soft shading.
Exporting the GLB
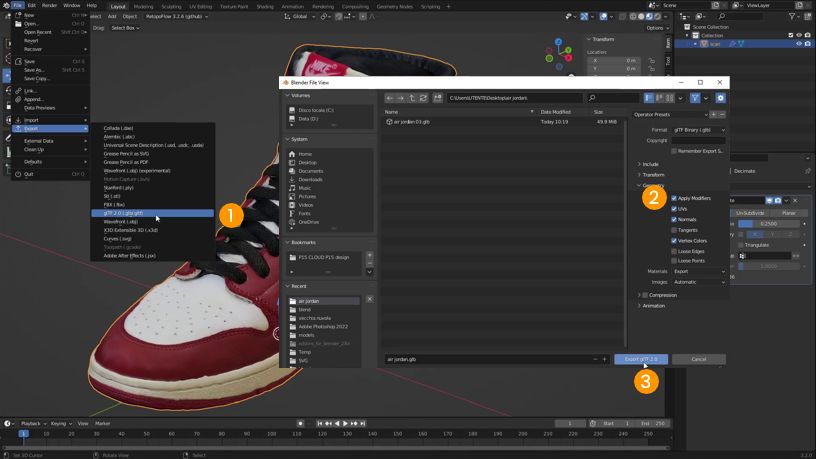
We go to the File > Export > glTF 2.0 menu 1. Then we open the Geometry panel and activate the Apply Modifiers 2 option to export the simplified geometry. We give the file a meaningful name and click on EXPORT GLTF 2.0 3.
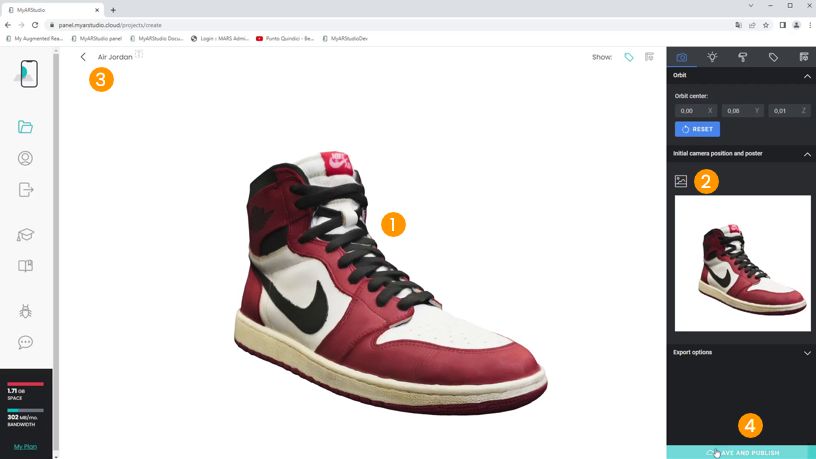
Uploading to My AR Studio
Let's open My AR Studio and click the new project icon.
We drag the GLB file just exported into the window 1. We then set the lighting as desired and create the poster 2. We name the project 3 and finally publish it 4.