Cinema 4D: Materials from CAD to AR
In this tutorial, we will take a CAD model, export it from Cinema 4D, and fine-tune its materials for use in My AR Studio for web 3D and Augmented Reality. This process builds on the excellent work done by Athanasios Pozantzis in his Cineversity video tutorial, where he demonstrates how to create a realistic CAD visualization of a drill in Cinema 4D.
We’ll start at the point where Athanasios finishes his render setup and proceed to export the model for AR, adjust the materials for accuracy, and prepare it for augmented reality.
Export the CAD Model as GLB
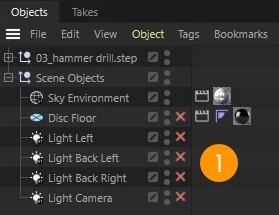
- Start by isolating the object to be exported — in this case, the drill.
- Disable all other elements that are not part of the actual model 1, such as:
- Lights
- Floor
- Backgrounds used for rendering.
- Disable all other elements that are not part of the actual model 1, such as:
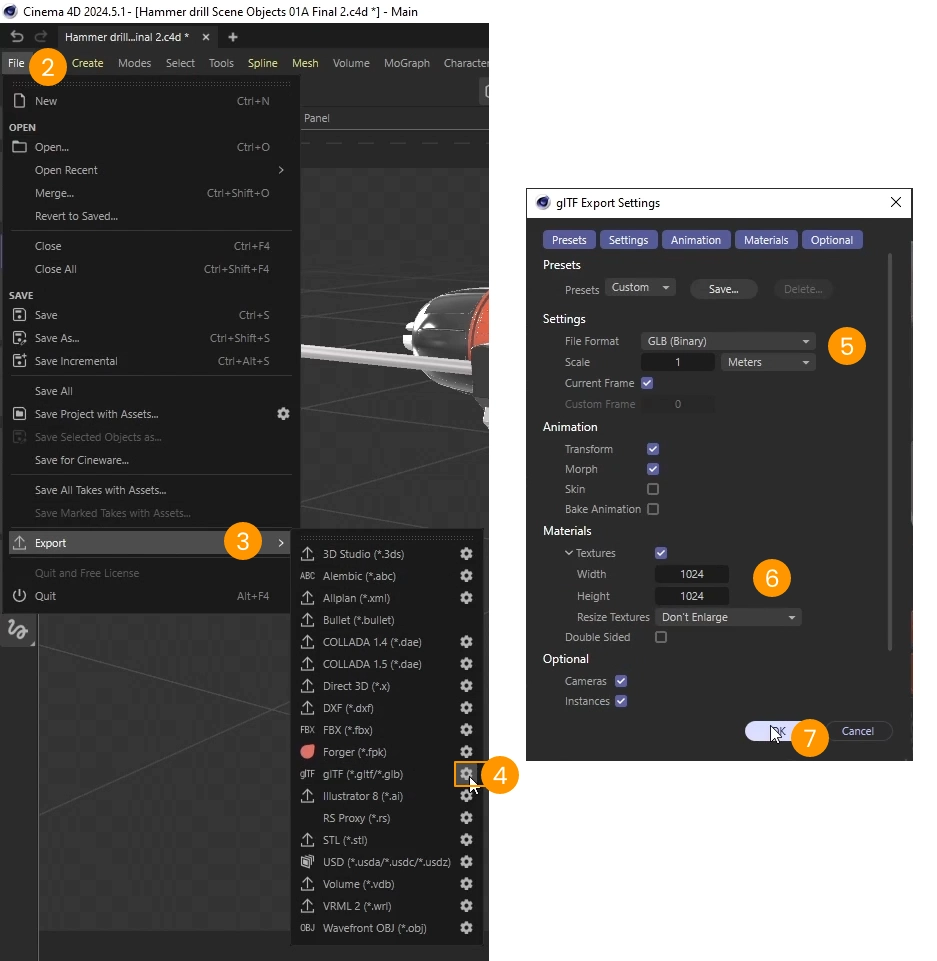
- Go to File 2> Export 3> gltf/glb, and click the gear icon 4 to access export settings.
- Ensure the file is exported as GLB Binary 5 with textures enabled 6.
- Click OK 7 to export the GLB file
Load the Model in My AR Studio
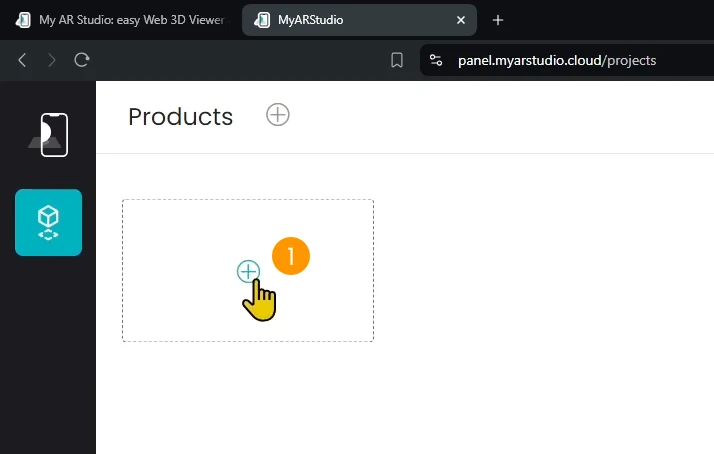
- Go to My AR Studio, click TRY IT NOW, and log in or create an account.
- Once inside your workspace, click the 1 icon to upload the exported GLB model.
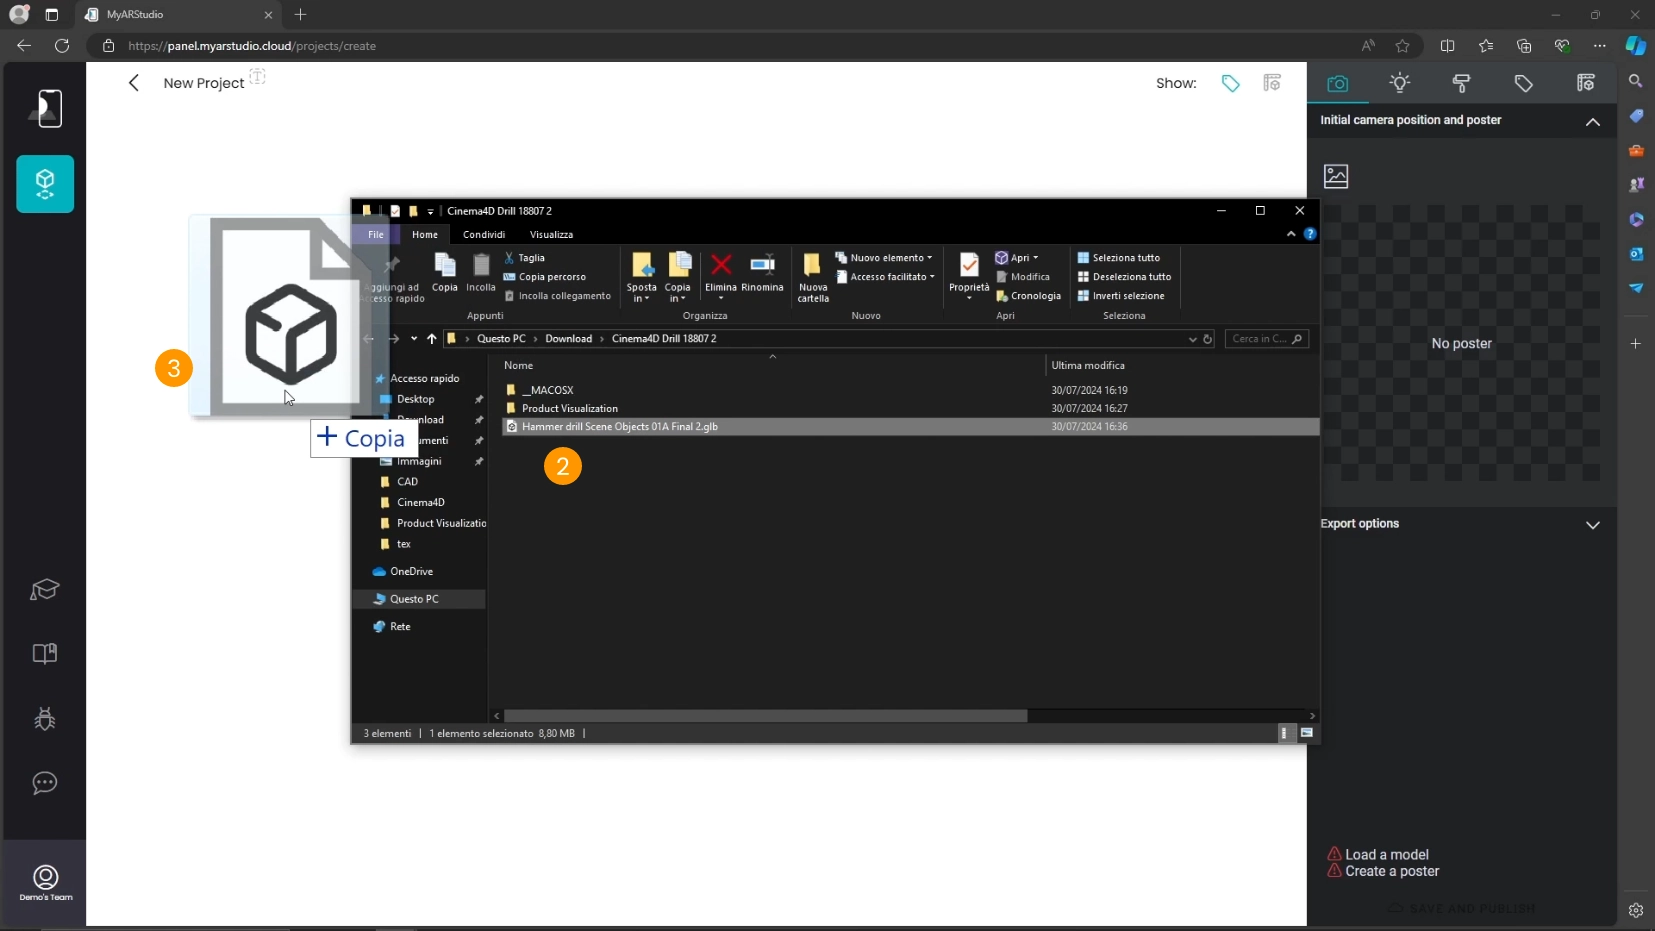
- Drag the exported GLB file 2 into the white area 3 of the My AR Studio editor. The model will now load.
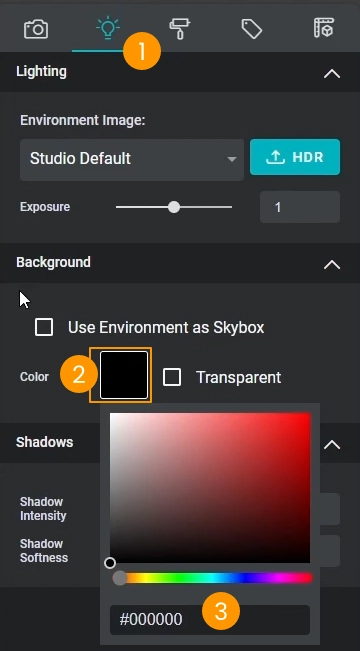
Set the Background color
- Go to the Tab Lighting 1
- Set the background to black for easier color matching:
- click on the Background color 2
- adjust the color by picking a color in the color-picker or entering the hexadecimal number (they must start with a #) 3
Set the HDR image for lightning
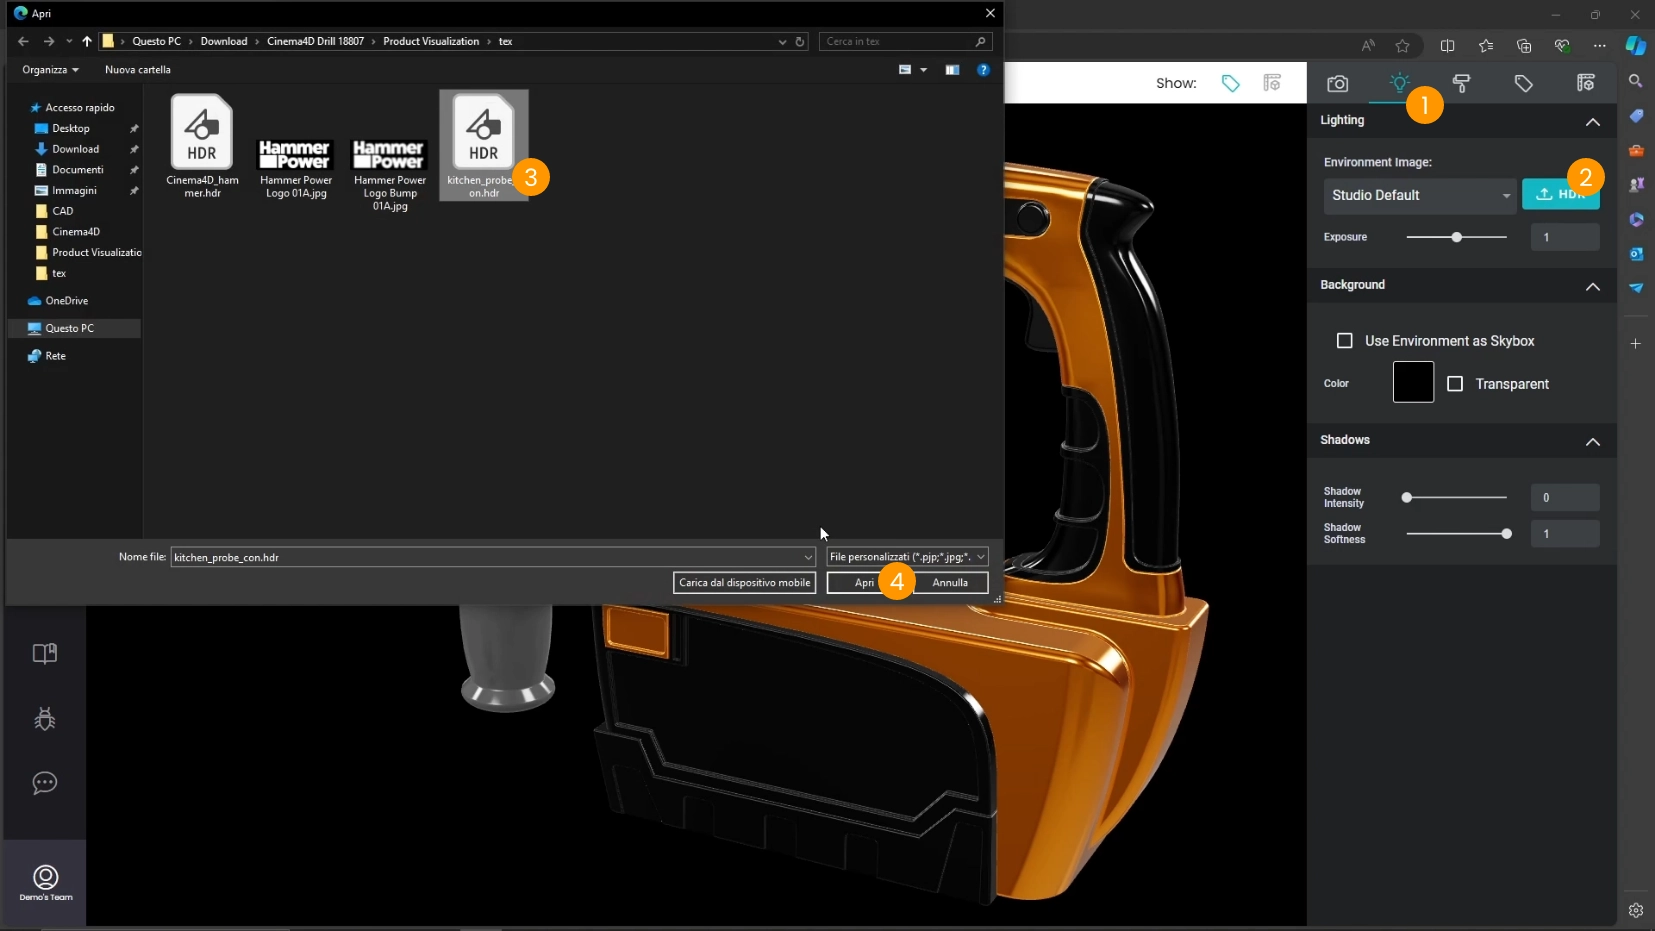
To ensure proper lighting, use the same HDR as in the Cinema 4D render.
- In My AR Studio, upload the HDR file.
- be sure to be in the Lighting tab 1
- click on the HDR button 2
- select the file in the dialog 3 and click open 4
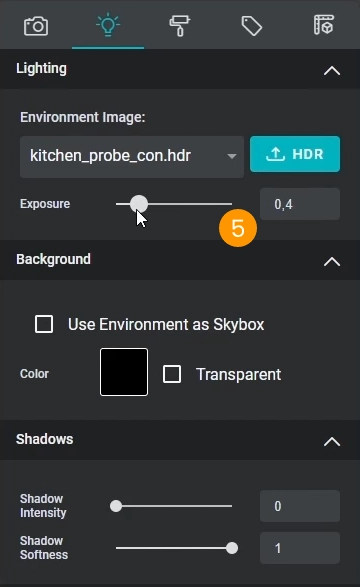
- You may have to adjust the exposure. In our case set it to approximately 0.4 5.
Correct Material Colors
During the GLB export from Cinema 4D it may happen that the colors are not exported correctly. Matching the material colors between Cinema 4D and My AR Studio is essential for consistency.
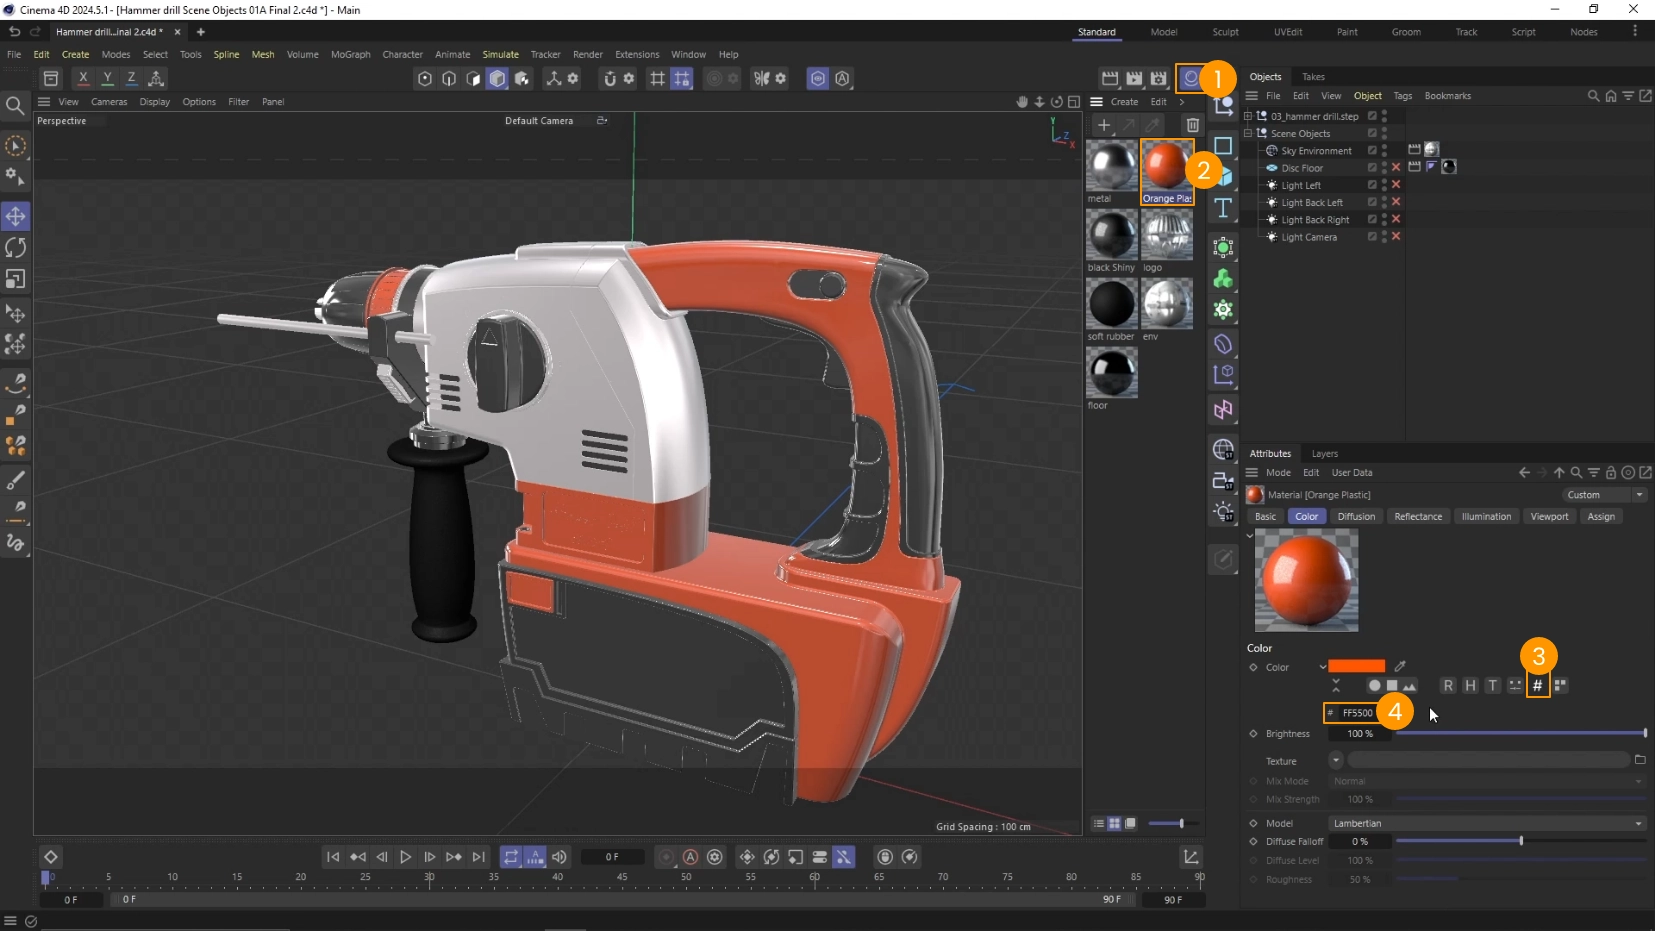
In Cinema 4D:
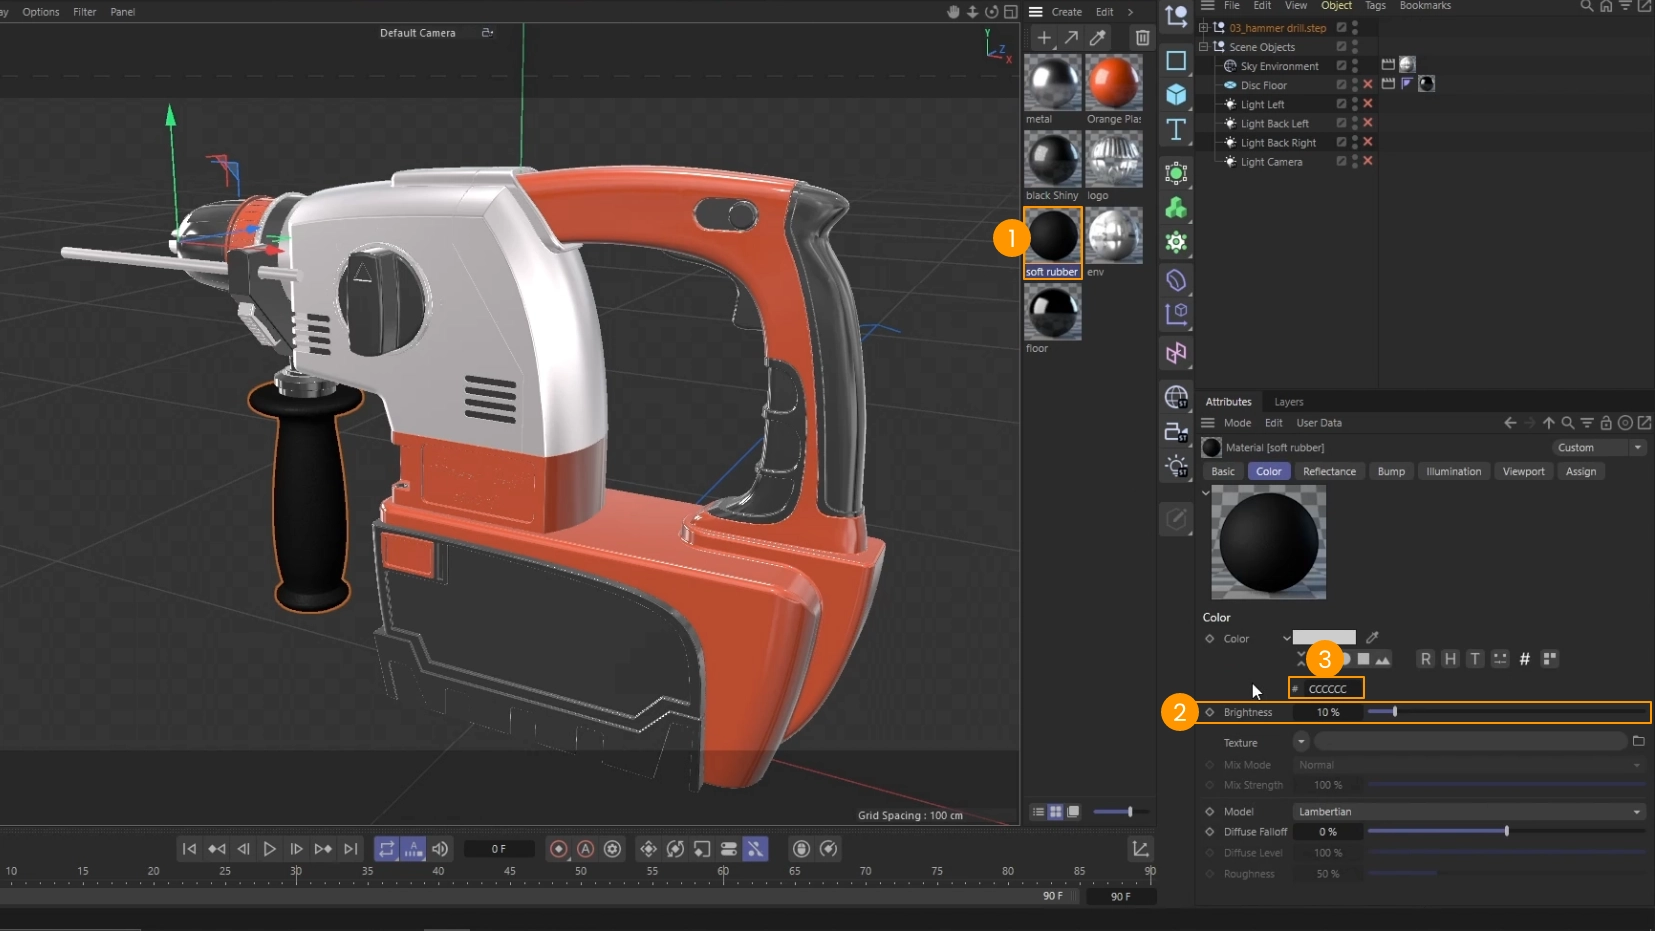
- Open the Material Manager 1
- Select one material, for example the orange plastic 2
- Make sure to be on the hexadecimal mode 3
- and copy the hexadecimal code for the color 4.
In My AR Studio:
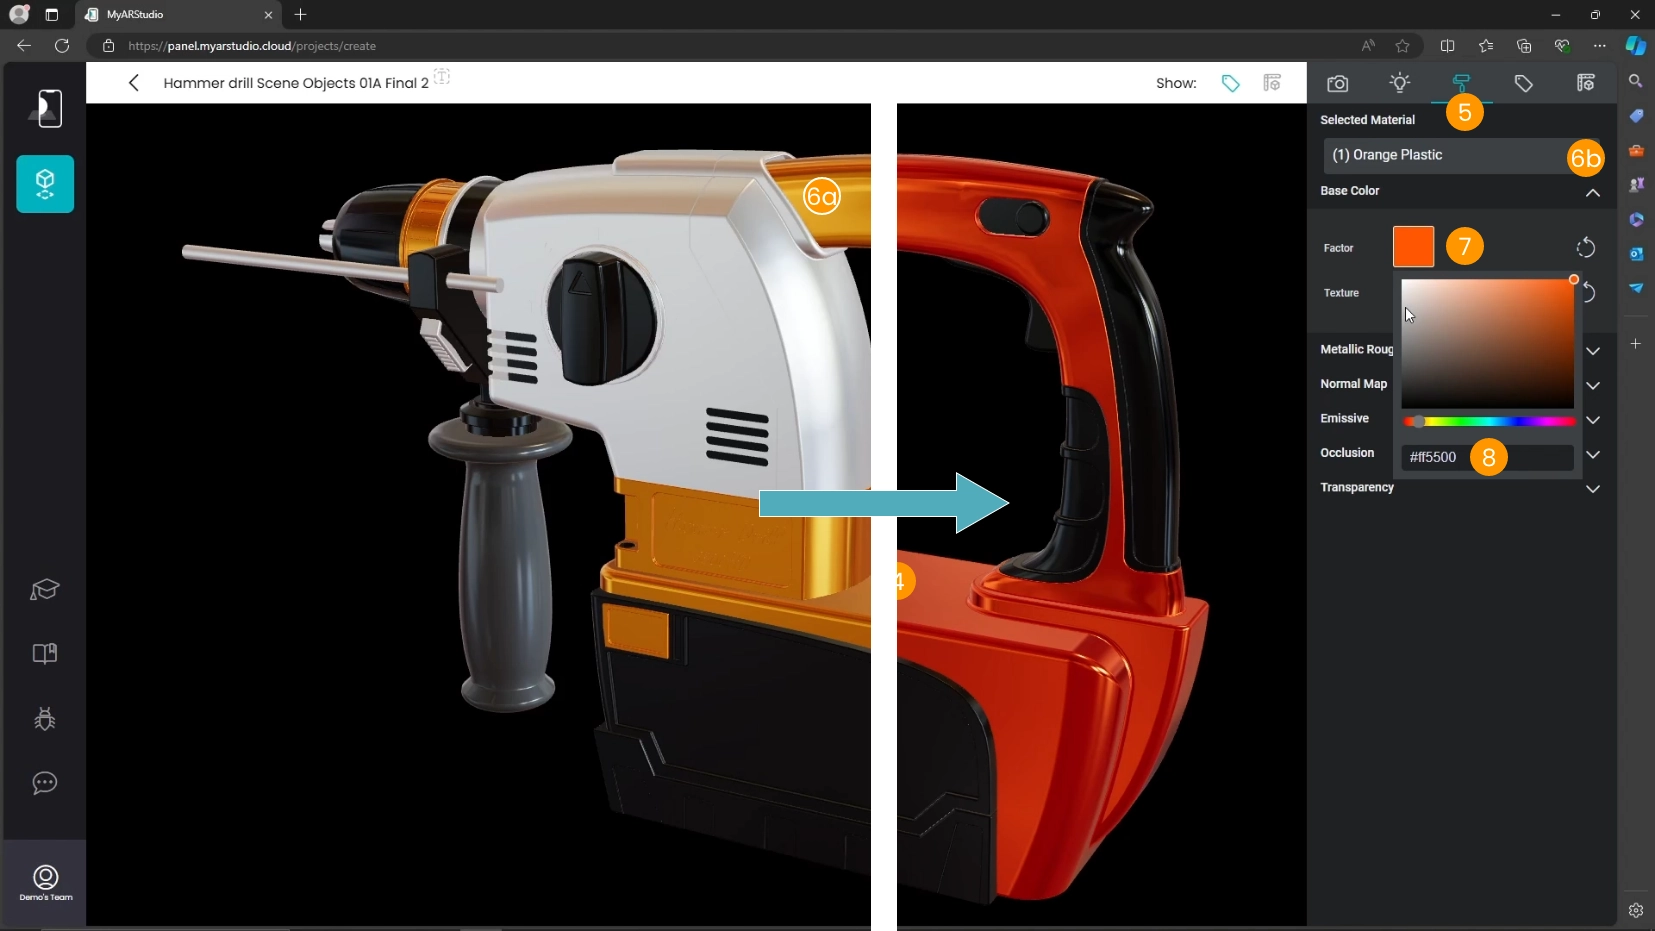
- Make sure to be on the Materials tab 5
- Select the orange plastic material:
- you can do this by clicking on a part of the model that has that material 6a
- or you can select it by name from the dropdown list 6b
- Locate the Base Color section and click on the color preview square area 7
- Paste the code into the color picker, ensuring you prepend the code with a hash (
#).
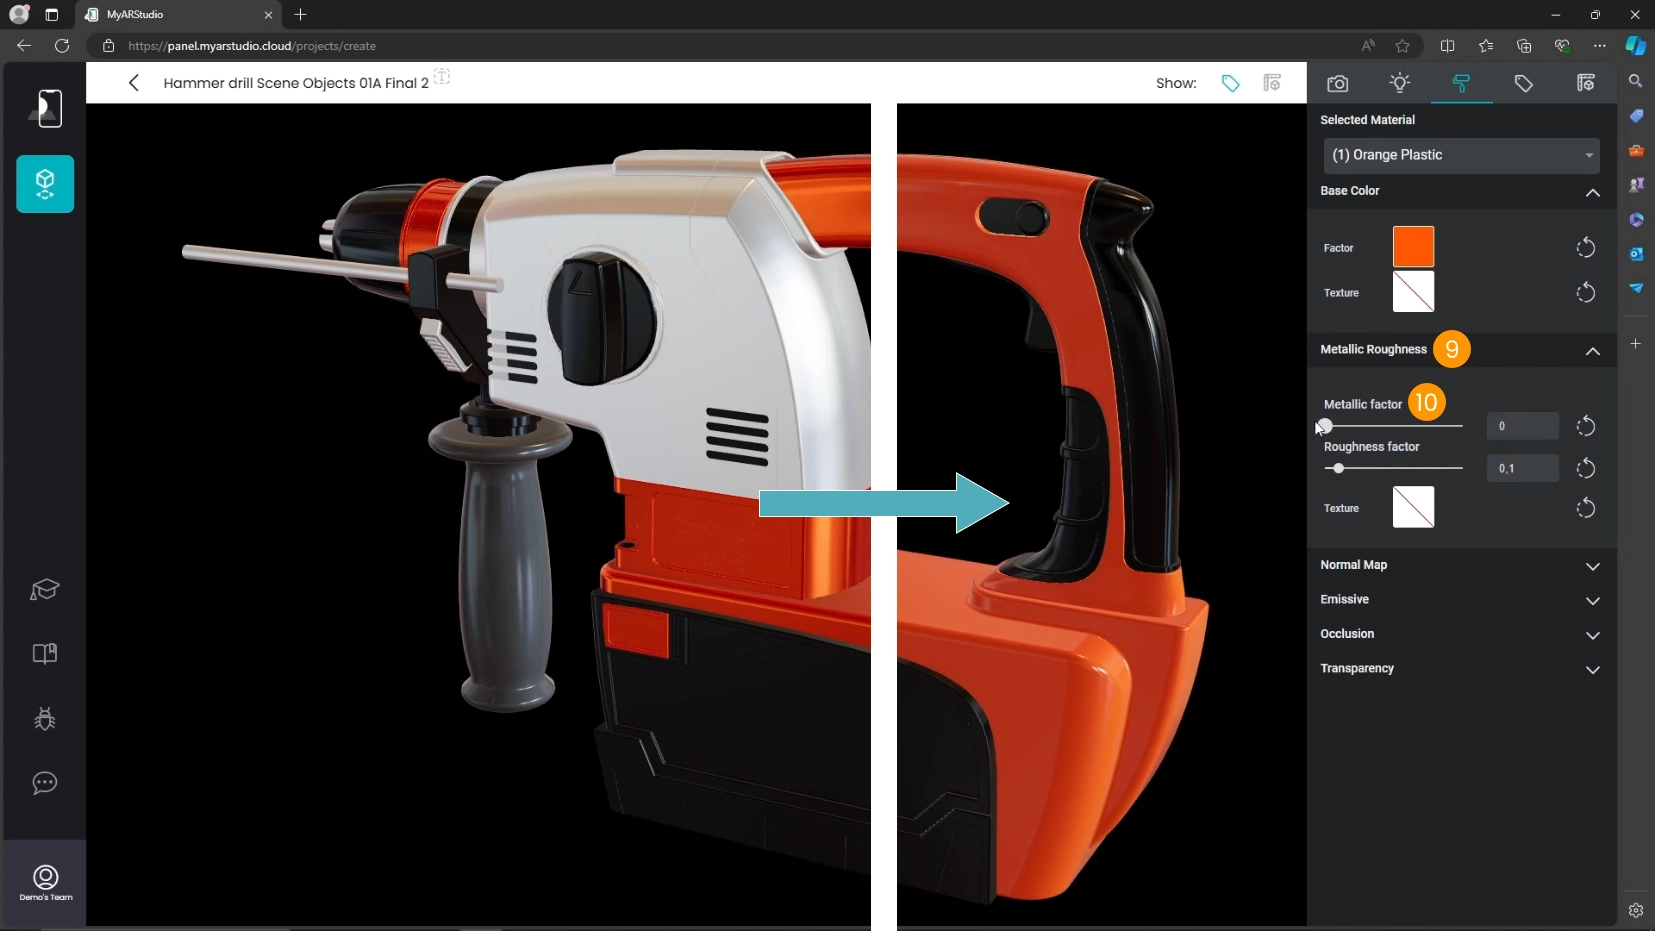
- Locate the Metallic/Roughness section 9 and expand it if necessary
- Adjust the metallic component to 0 10 (since plastics are non-metallic).
- Repeat the process for the other materials.
For the handle material 1, the brightness is scaled by 10% 2 so the hexadecimal value cannot be used as is 3.
You need to adjust the color by scaling value according to the brightness factor.
Here's how to do it:
- the 0xCCCCCC value is made of 3 values Red, Green and Blue.
- the Red value is 0xCC
- convert it to decimal: use can the calculator in "Programmer" mode that lets you change the base 8, 10, 16 (octal, decimal, hexadecimal).
- 0xCC (base-16) -> 204 (base-10)
- scale the value to 10% (the value of the brightness in Cinema 4D)
- 204 * 10% -> 20 (discard the fractional part)
- convert back to hexadecimal
- 20 (base-10) -> 0x14 (base-16)
Repeat this process for each component and recompose the final number.
In this case they are equal so the final composed number is: 0x14 for Red, 0x14 for Green, 0x14 for Blue.
The final number becomes #141414 (remember to start with the #).
Scale the Model for AR
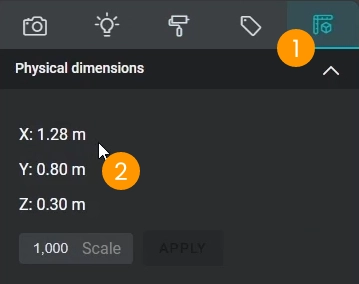
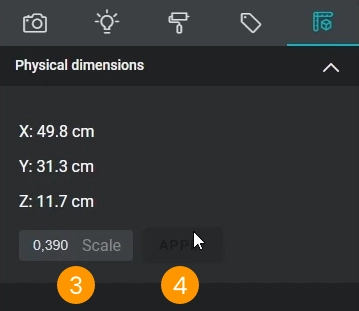
In the Dimensions tab 1 you see the physical dimensions of your 3D object. Since all your products exported with My AR Studio are Augmented Reality ready, don't forget to set the correct dimensions.
In this case this drill is way too large 2. This was probably caused by a conversion between inches and centimeters.
To adjust the scale:
- Calculate the scale factor by dividing 1 by 2.54 to convert inches to centimeters, resulting in a factor of approximately 0.39.
- Insert the conversion factor 2
- Click APPLY 3
The drill has now the correct physical size.
Publish
At this point you made all correction and you can create the poster and upload to My AR Studio as usual.
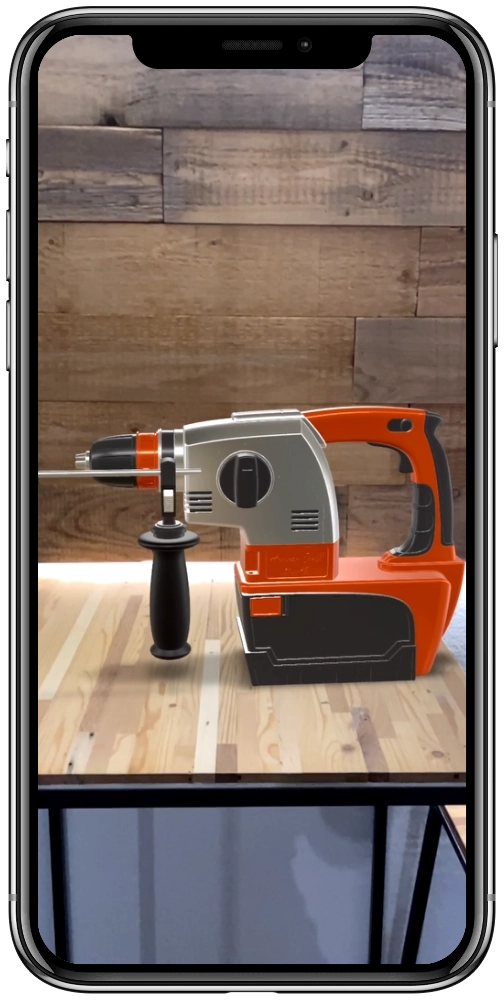
Here's the drill in Augmented Reality.
You can try it yourself!