Cinema 4D Materials in AR
In this guide, we'll explore how to adapt Cinema 4D materials for use on the web and in augmented reality (AR). The focus is on exporting models, adjusting materials for AR platforms like My AR Studio, and ensuring that the visual output stays consistent with the original Cinema 4D render.
The tutorial introduces a set of diverse materials including plastics, wood, ceramic, cement, leather, metals, transparent materials and materials with displacement and demonstrates how to handle each in the AR environment.
Exporting the Model from Cinema 4D to GLB
The export process for models follows standard steps in Cinema 4D:
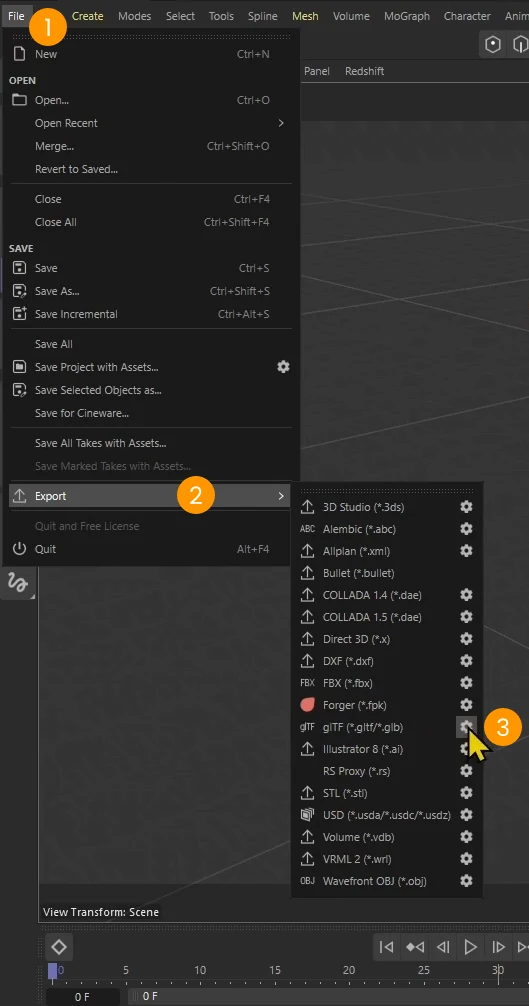
- Go to File 1 > Export 2 > GLTF/GLB, and click the settings (gear) icon 3.
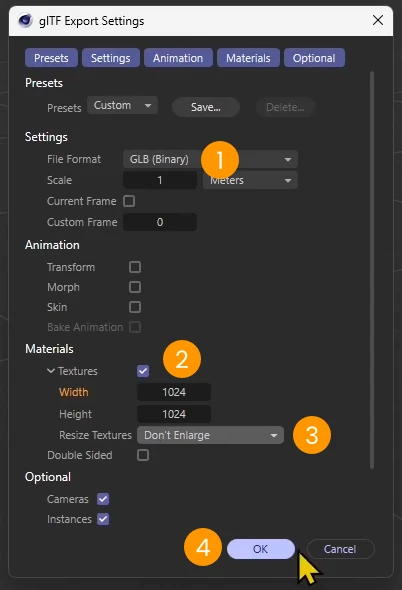
- In the glTF Export Settings panel:
- Set the File Format to GLB binary 1.
- Enable the textures 2.
- Adjust the texture resize to "Don't Enlarge" with a size of 1024 px. This helps maintain quality while optimizing for the web and AR.
- Click su OK 4
Once exported, you can upload the GLB file to My AR Studio by dragging it into the workspace.
Adjusting Materials in AR
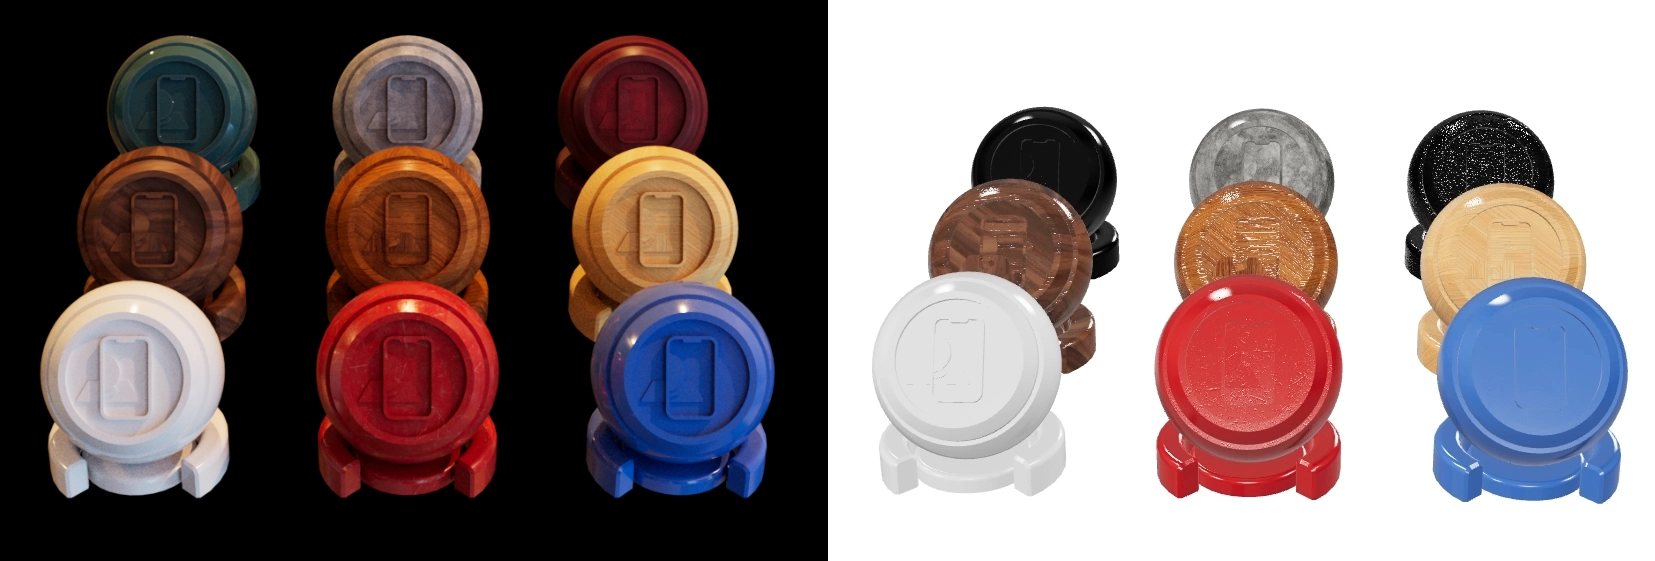
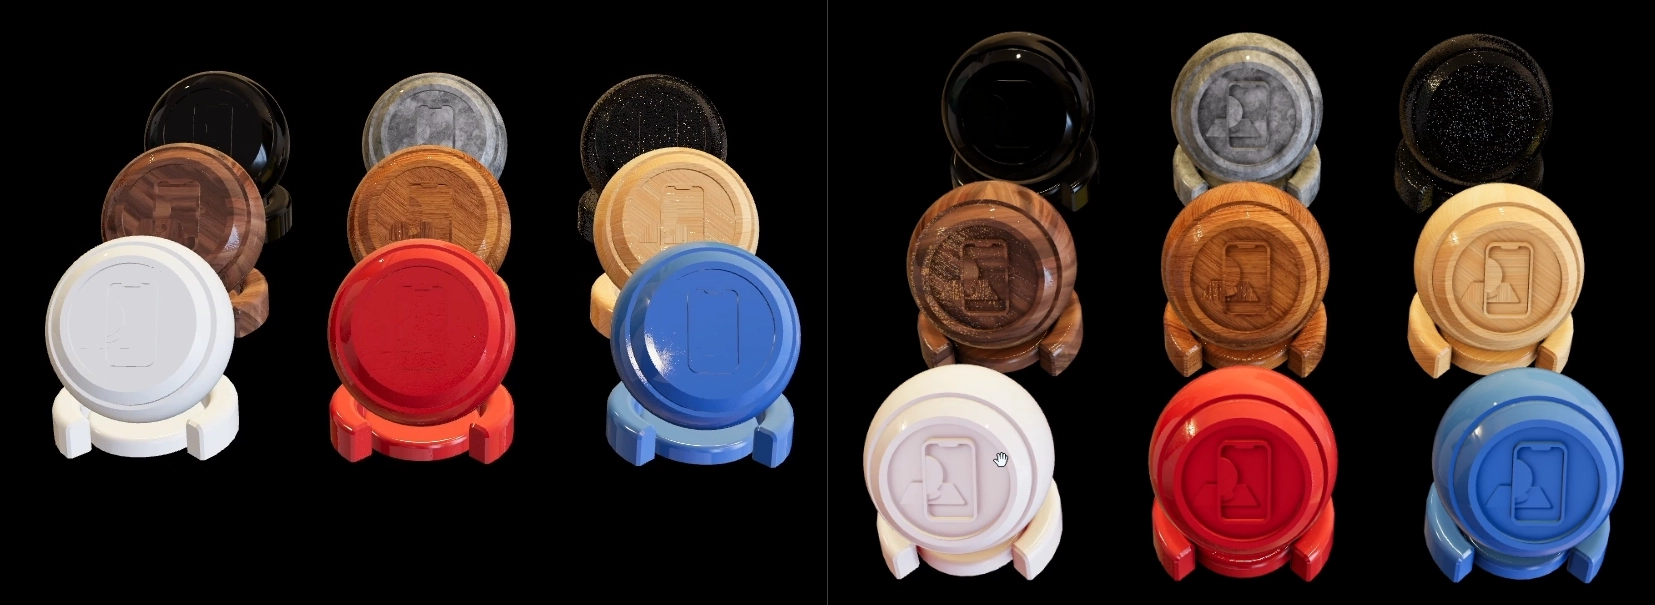
In the following screenshot we can see the Cinema 4D render on the left and the initial import in My AR Studio on the right. The materials need adjustments.
Lighting and HDR Setup
To maintain consistency between Cinema 4D and My AR Studio, load the same HDR image used in the original render. Set the background to black for easier material comparison and fine-tuning of details.
Here's the scene before and after setting the HDR and background as in Cinema 4D.

Ambient Occlusion
Ambient Occlusion (AO) helps accentuate object details.
- Be sure to be in the Materials tab 1 of My AR Studio
- Select a material by clicking on the part of an object that has that material (e.g., white sphere) 2a or by selecting its name in the material dropdown 2b
- Locate the Occlusion section 3 and load the AO texture in the appropriate section:
- Click on the Texture preview 4
- Click on the IMAGE upload button 5
- Select the Ambient Occlusion texture
- Click Open 7
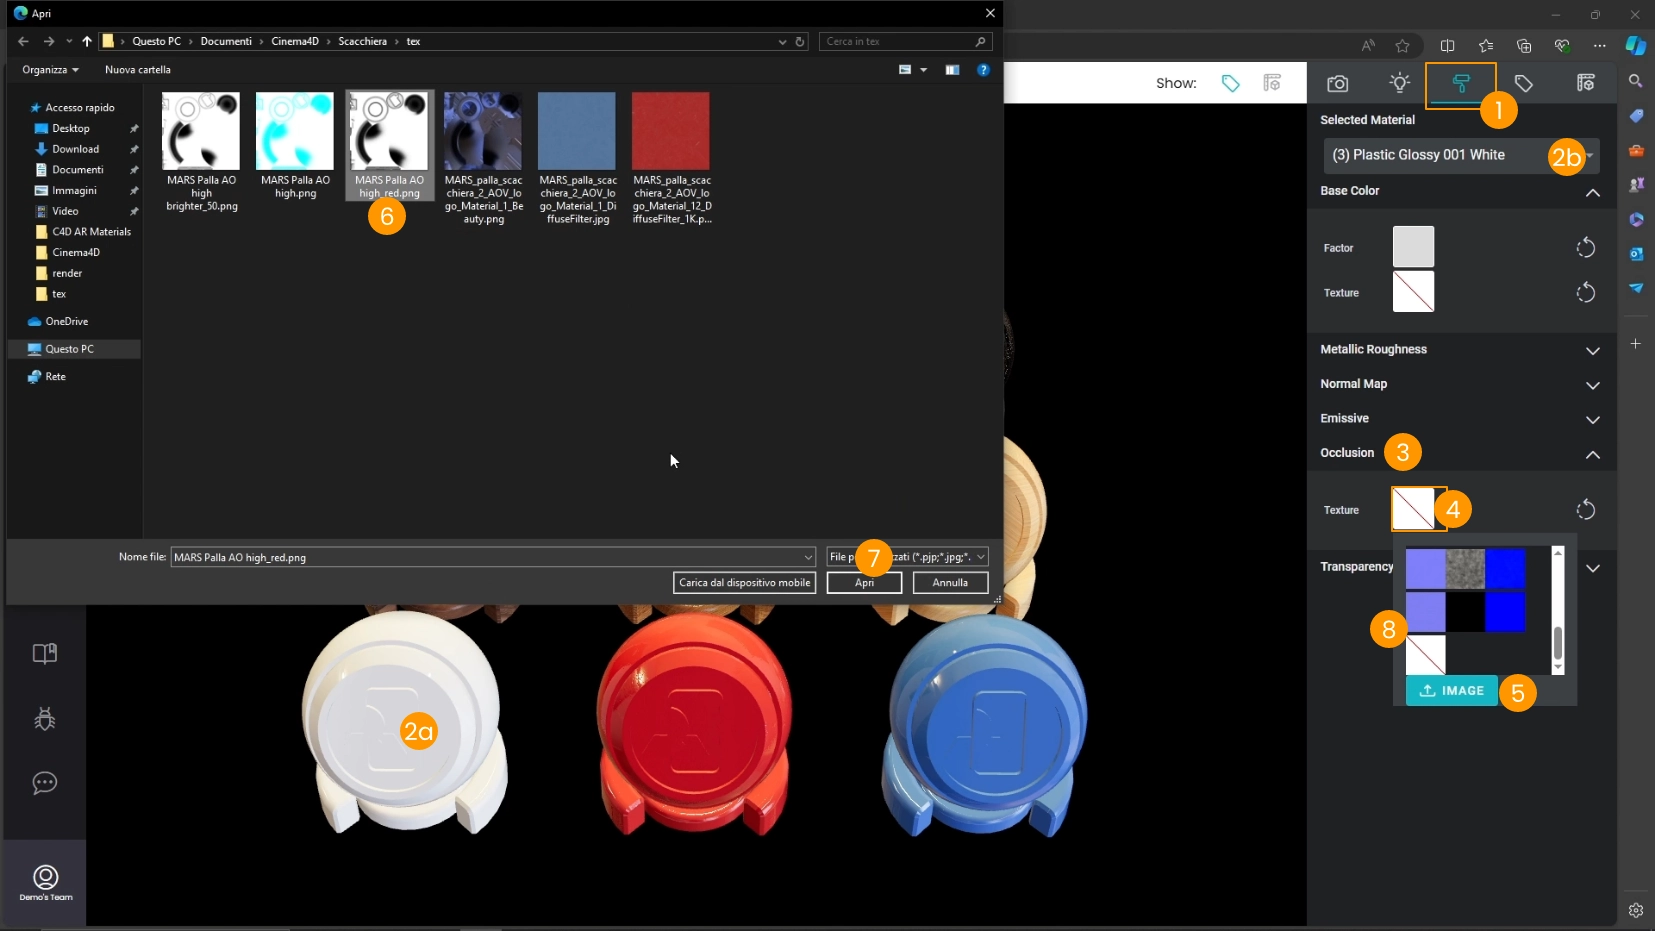
- If you need to apply the same texture multiple times you will find it in the textures list 8 after the first upload. Do not upload the texture multiple times but choose it from this list.
In our case the AO texture was generated with the software Substance Painter, that often is offered in bundle with Cinema 4D. See also our guide to manage materials in Substance Painter.
Here you can see the result before and after applying the Ambient Occlusion texture. Details of the objects are more visible.
Metalness and Roughness
For some materials the exported metalness and roughness texture may be sub optimal. In these cases you can deactivate the texture for metalness and roughness and manually adjust these values.
Here's how to do it:
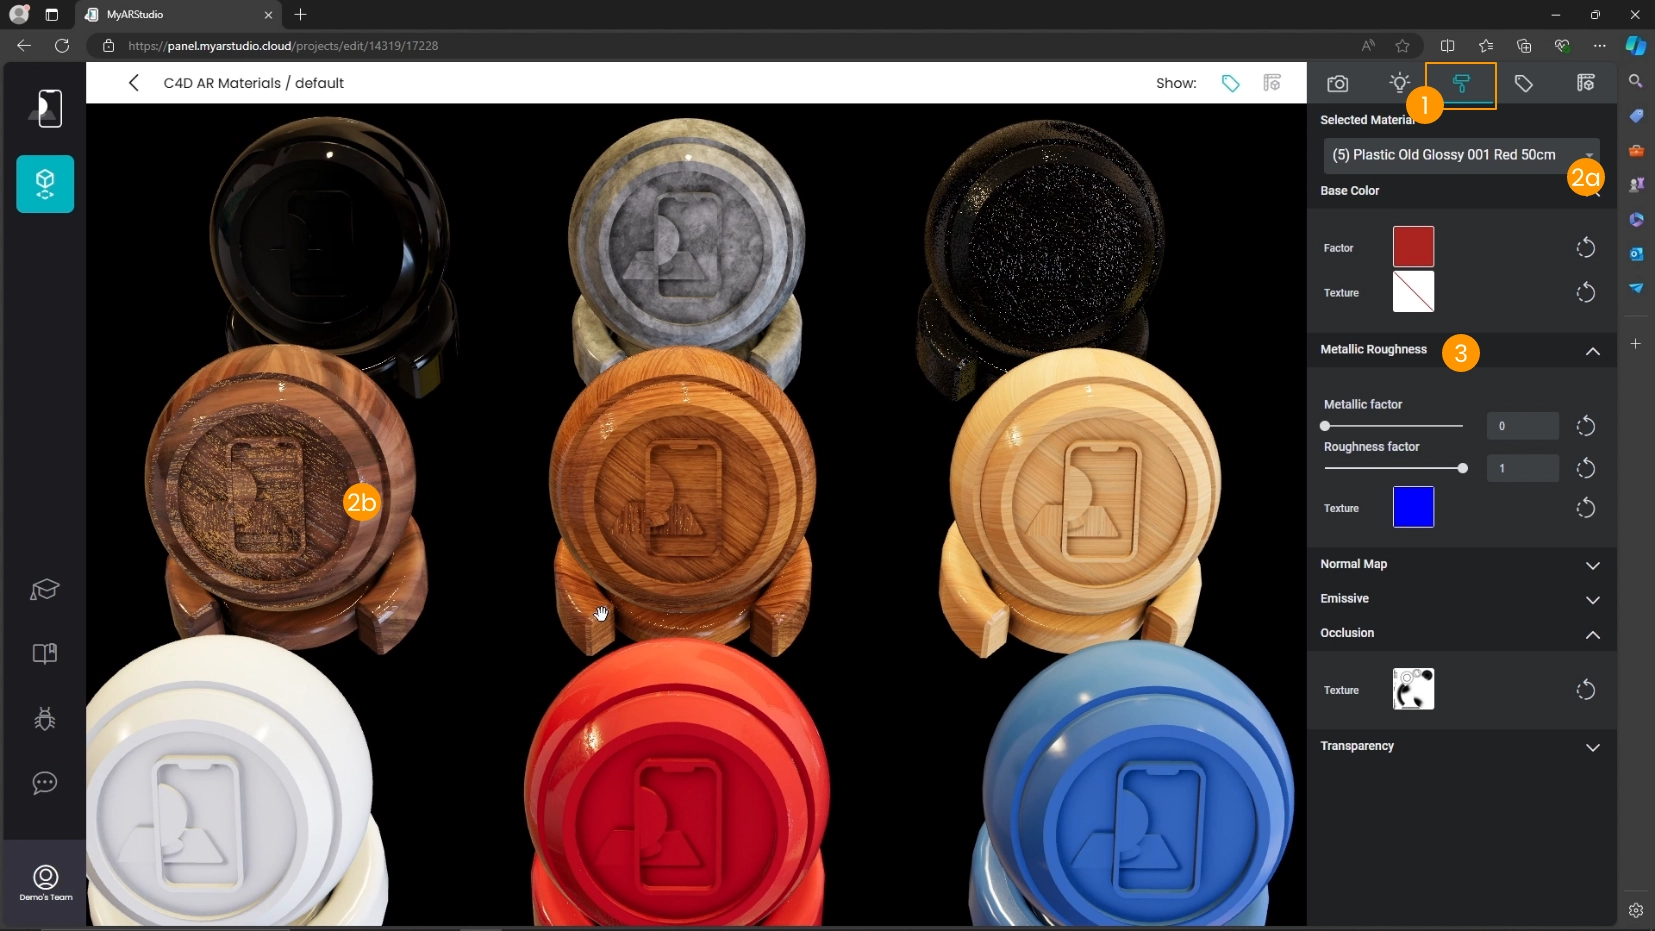
- Make sure to be Materials tab 1
- Select one material from the list 2a or click on a part of an object to select the corresponding material 2b
- Locate the Metallic Roughness section 3
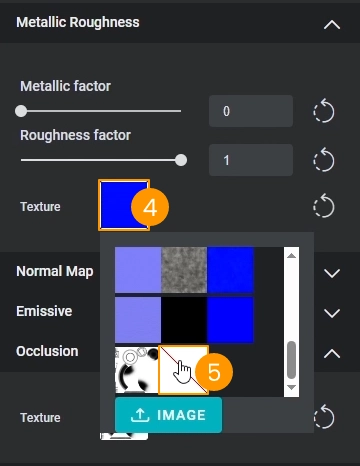
- Click on the texture preview 4
- Select the empty texture 5 in the textures list menu
- Adjust metalness and roughness values manually 6
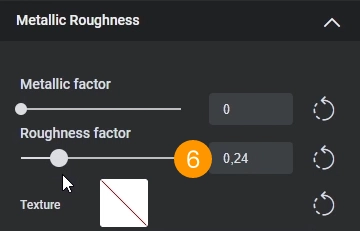
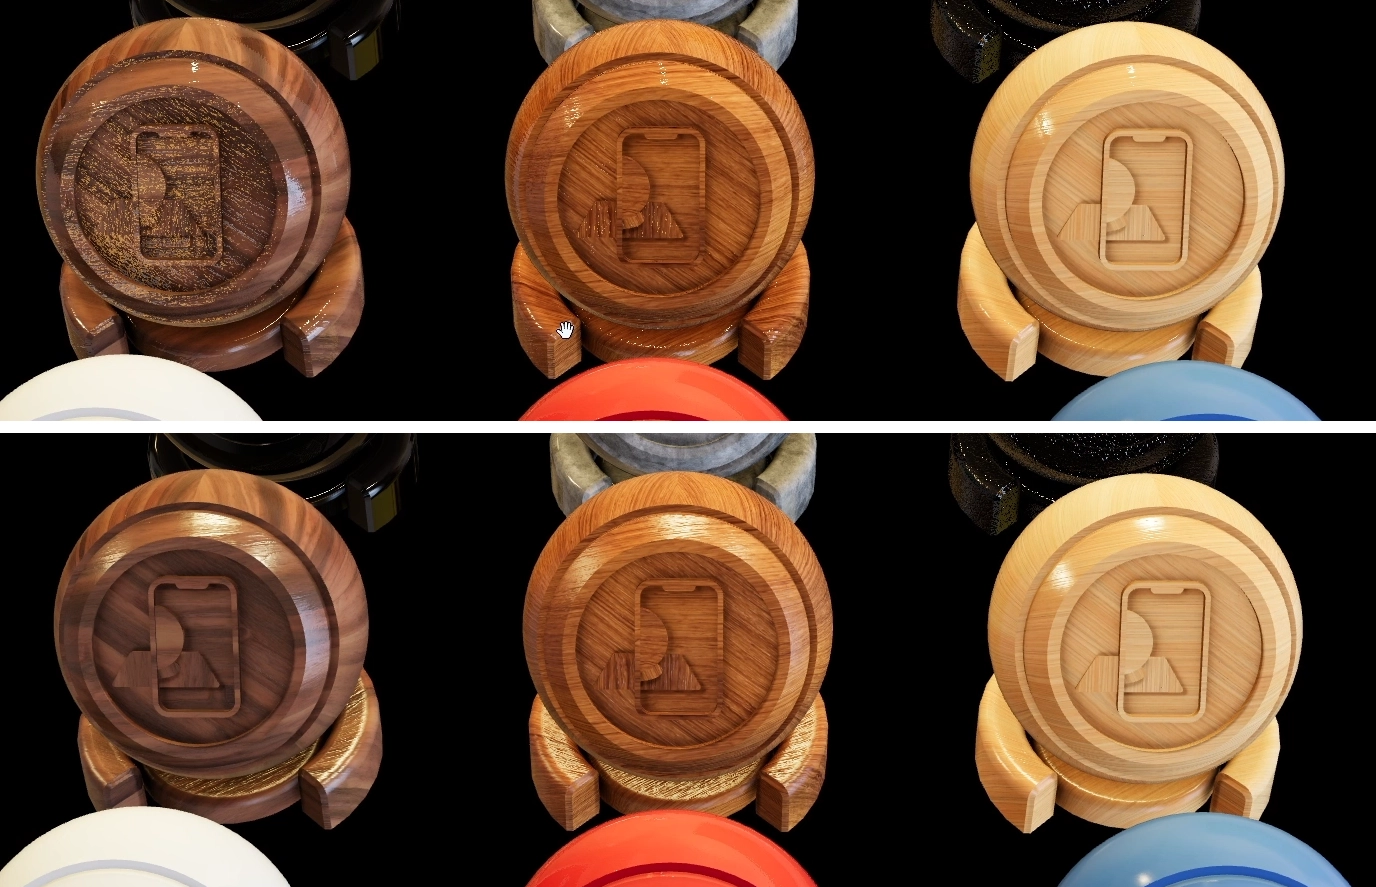
Here are the wood materials with the Cinema 4D exported textures (above) and with the manually adjusted values (below).
Handling Specific Materials
Image-Based Materials
Wood and other image-based materials generally transfer well, requiring minimal adjustments. You can deactivate metalness and roughness textures and fine-tune the material's roughness.
Complex Materials: Leather, Scratched plastic and Ceramic
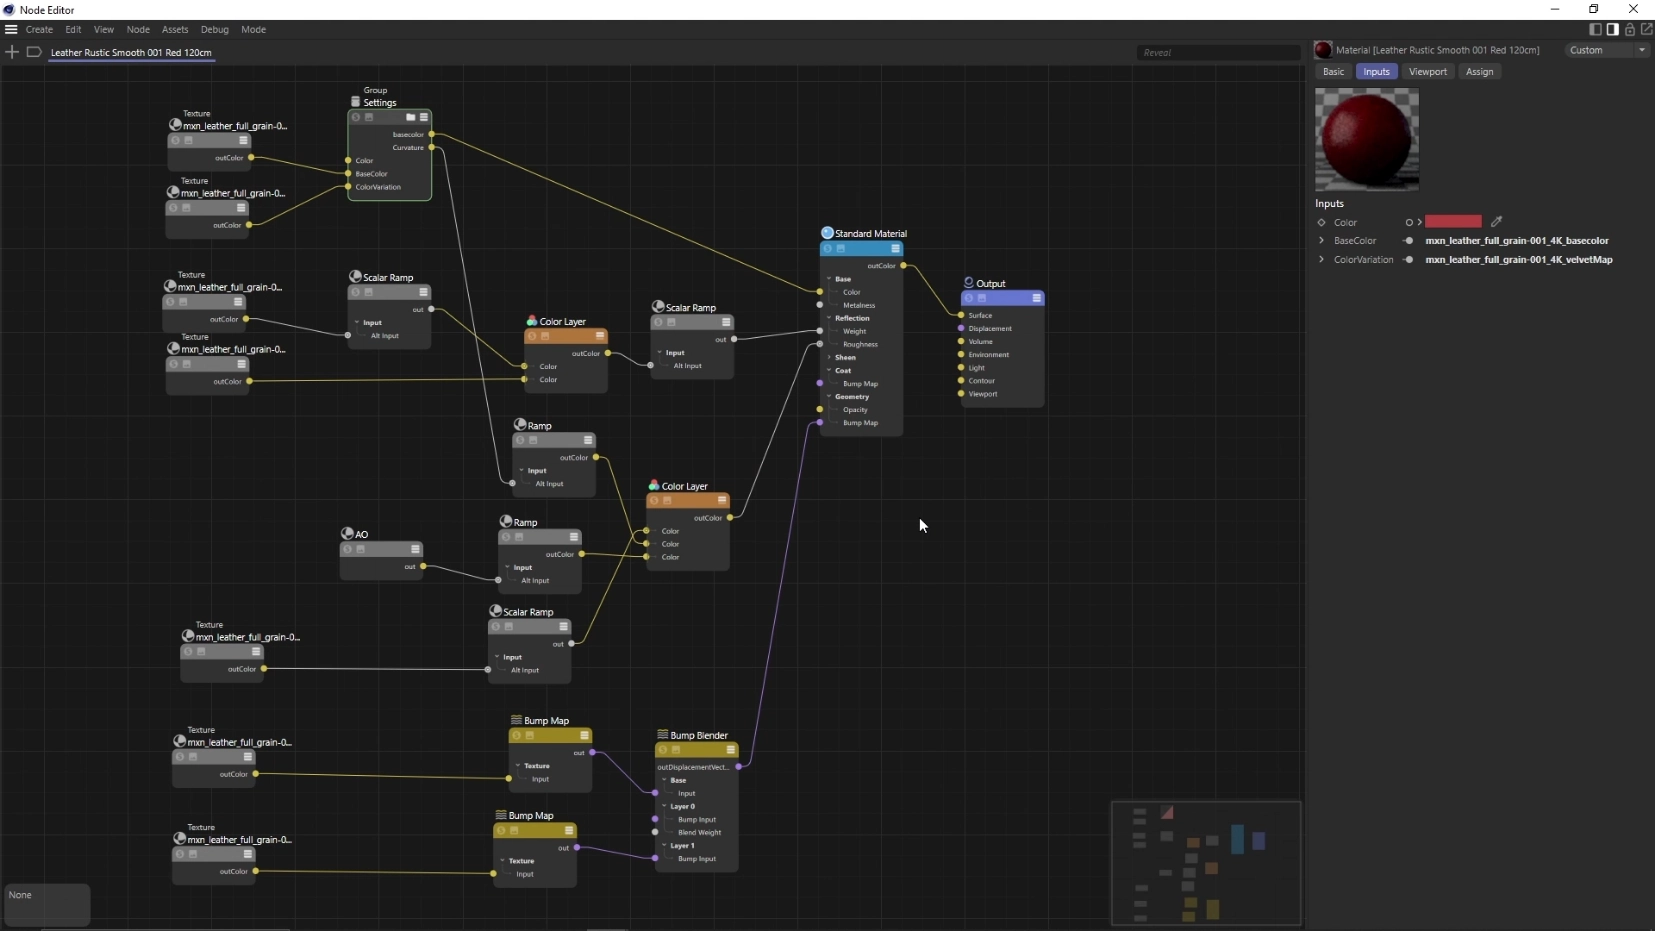
Materials with complex shaders, such as leather or ceramic, often don't fully export. To address this, you can bake the material textures in Cinema 4D and reapply them in My AR Studio.
For example this is the material graph for the leather material used in the tests.
Texture Baking in Cinema 4D
The texture baking technique allows you to render some properties of an object not on a frame but on a texture. In our case we will bake the base color of the scratched plastic, leather and ceramic materials that were not exported correctly.
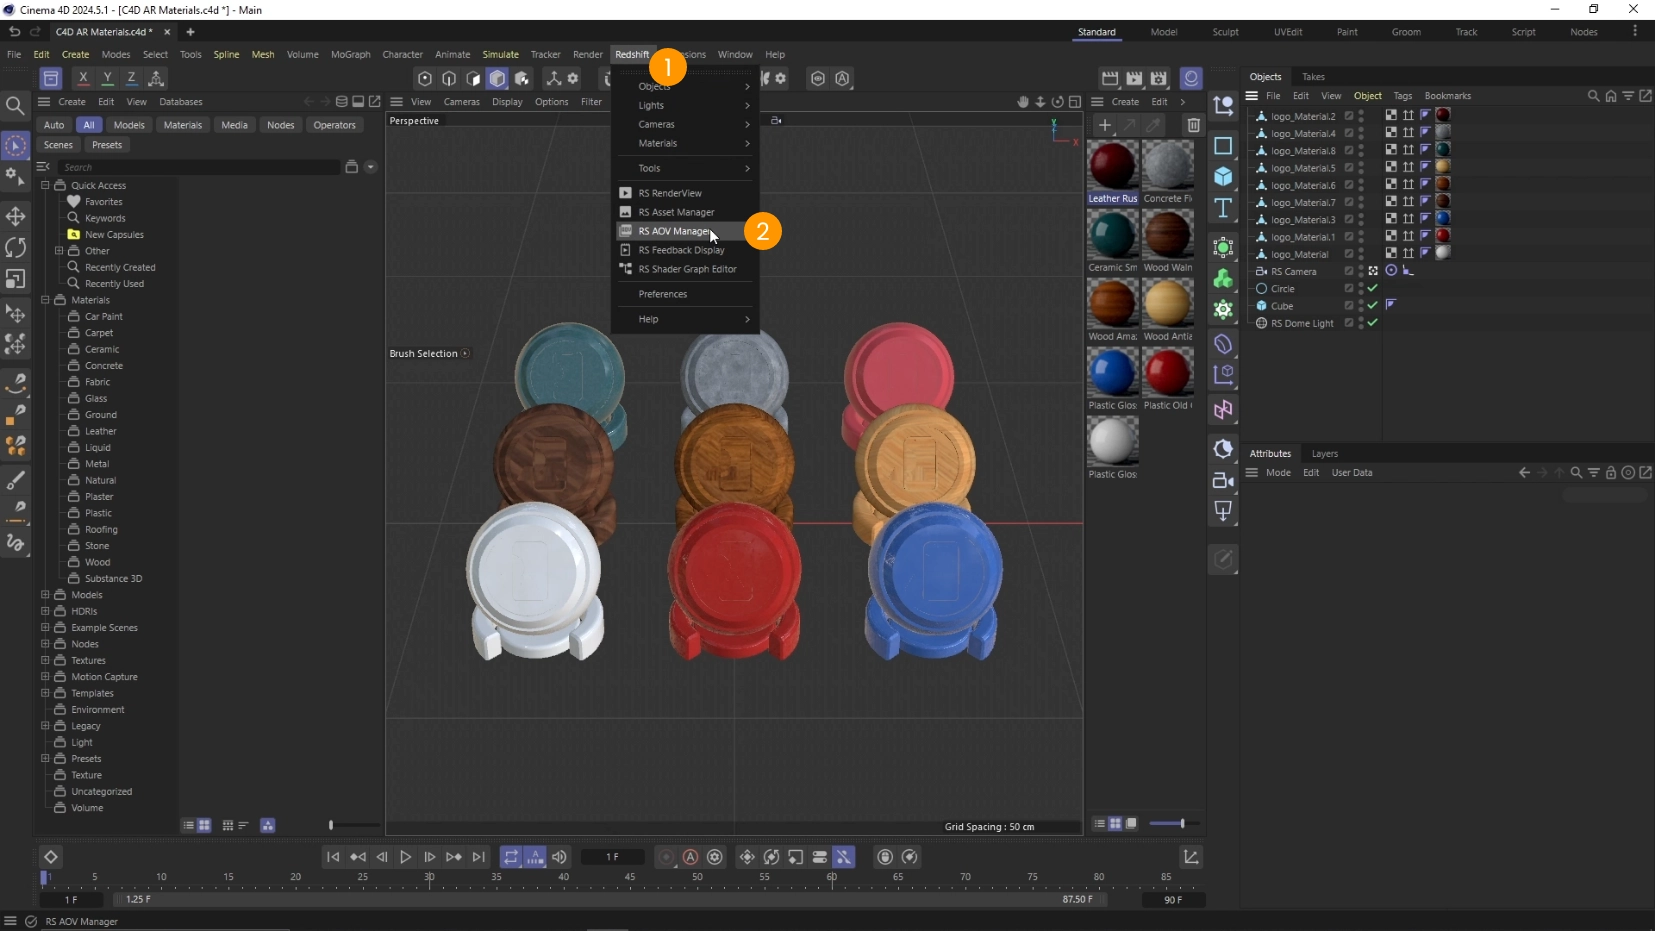
- Click on Redshift 1 > RS AOV Manager 2
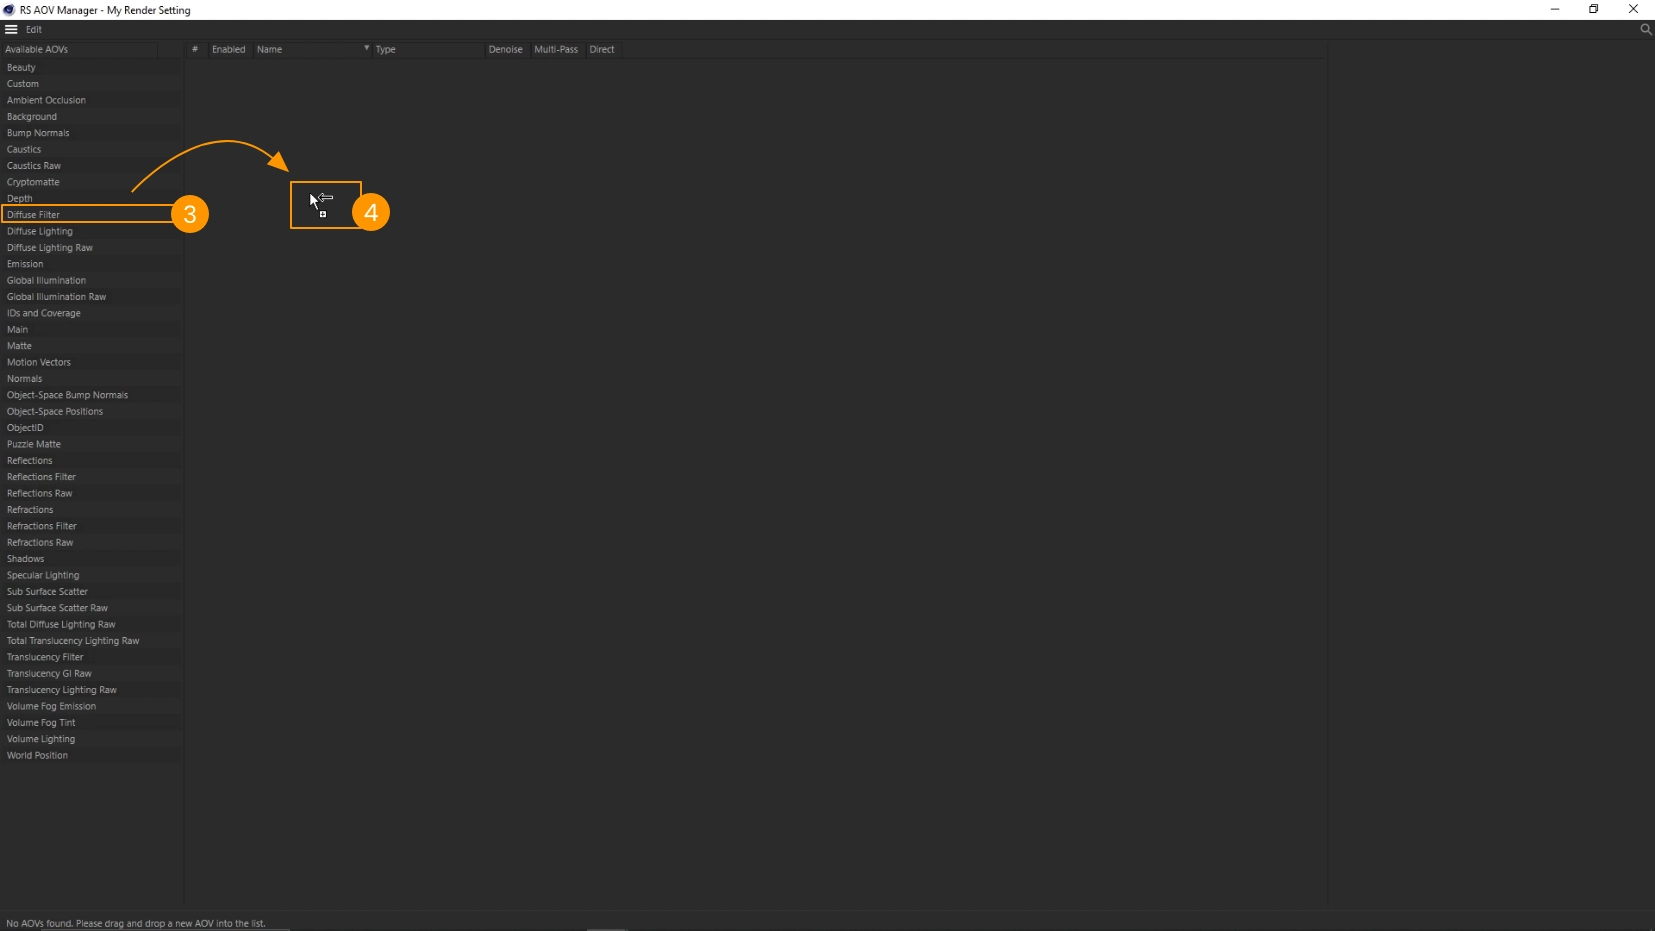
- Locate the Diffuse Filter 3 and drag&drop it into the right area 4
- Disable Multi-pass 5 and enable Direct 6

- Select the DiffuseFilter row 7
- Change the file format to JPEG or PNG 8
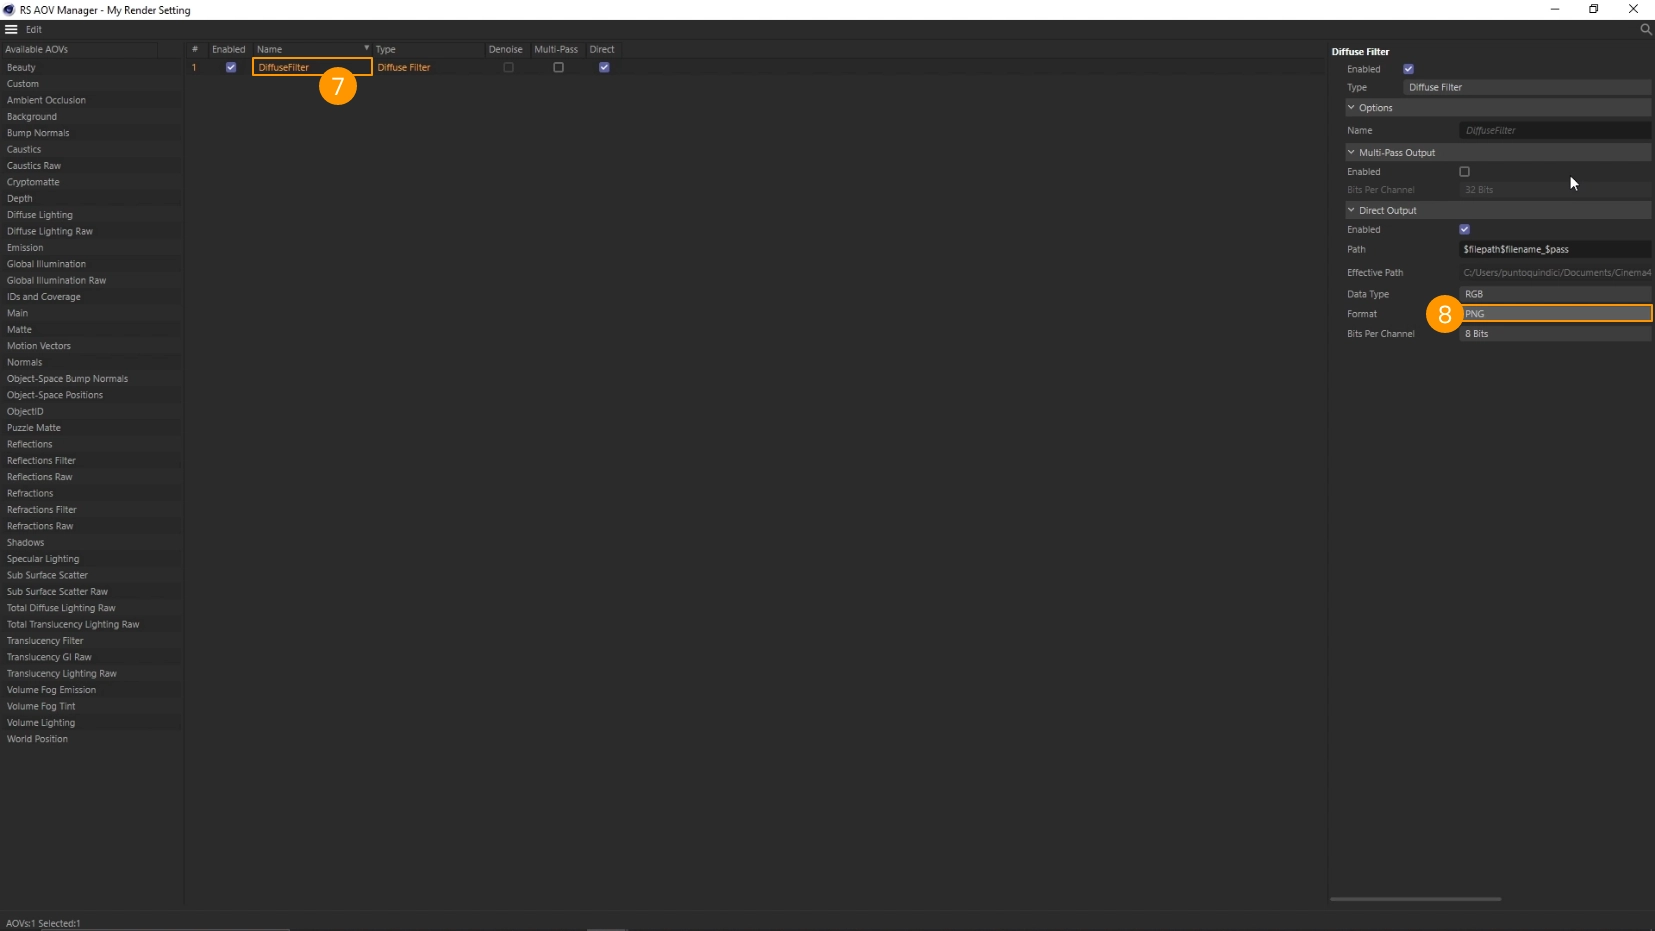
- Close the window
Now we create a bake set and add some objects to it.
- Select the object that you want to bake from the 3D view 1 2 3 or from the Objects panel 4
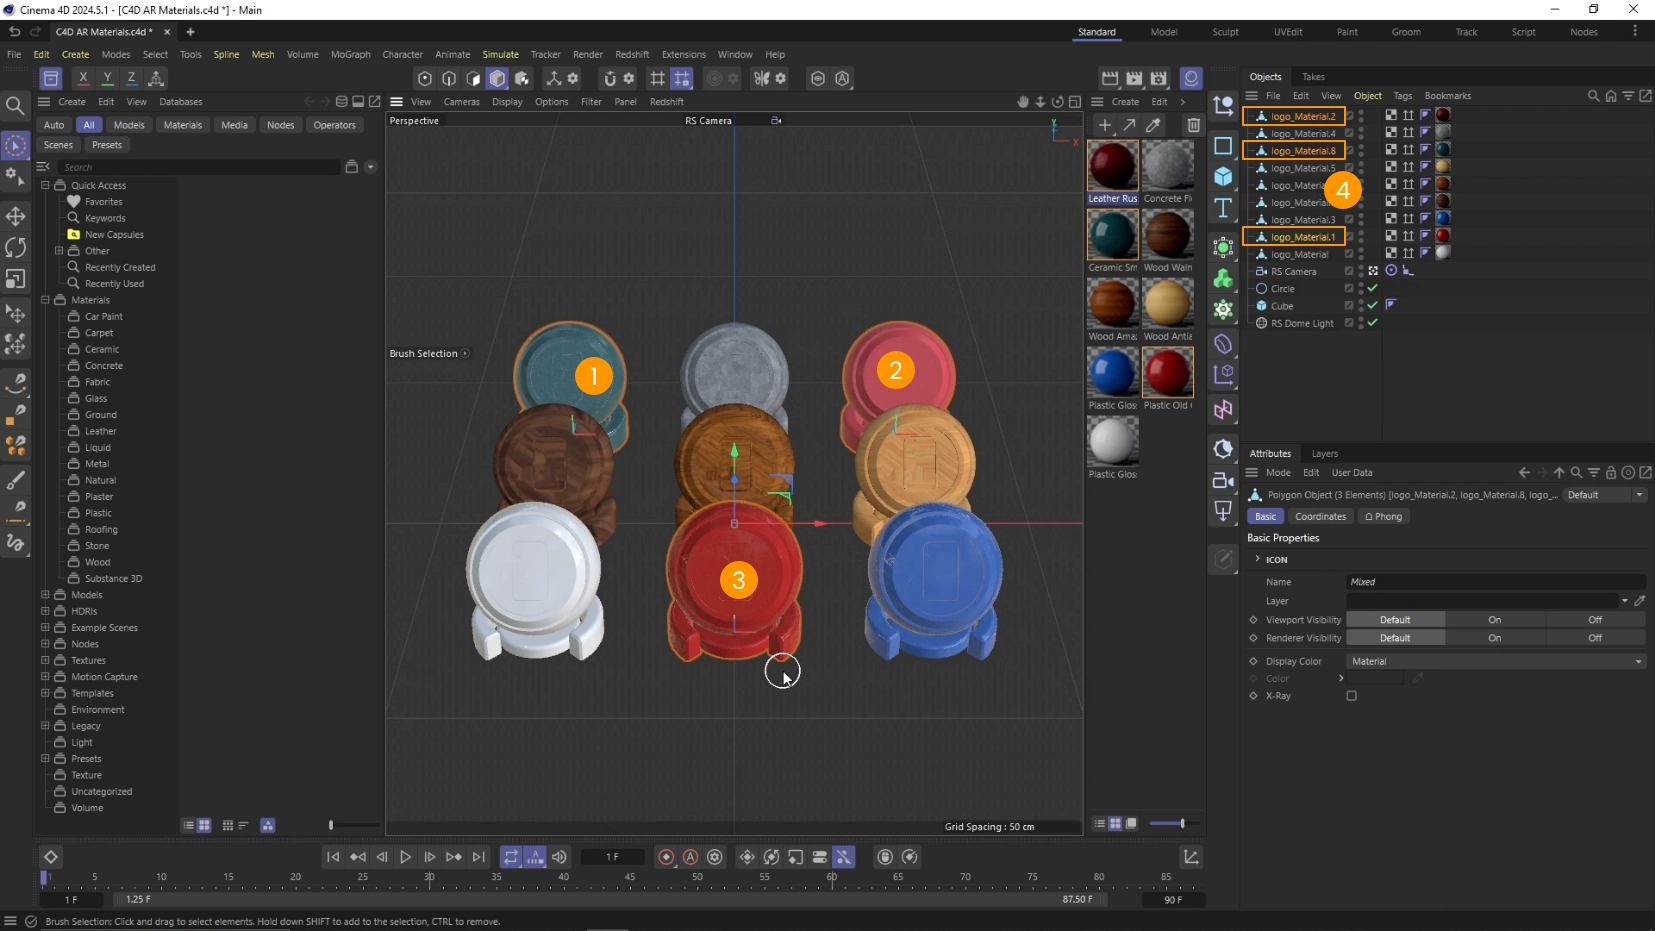
- Click on Redshift 5 > Tools 6 > Texture Baking 7 > Create BakeSet from Selection 8
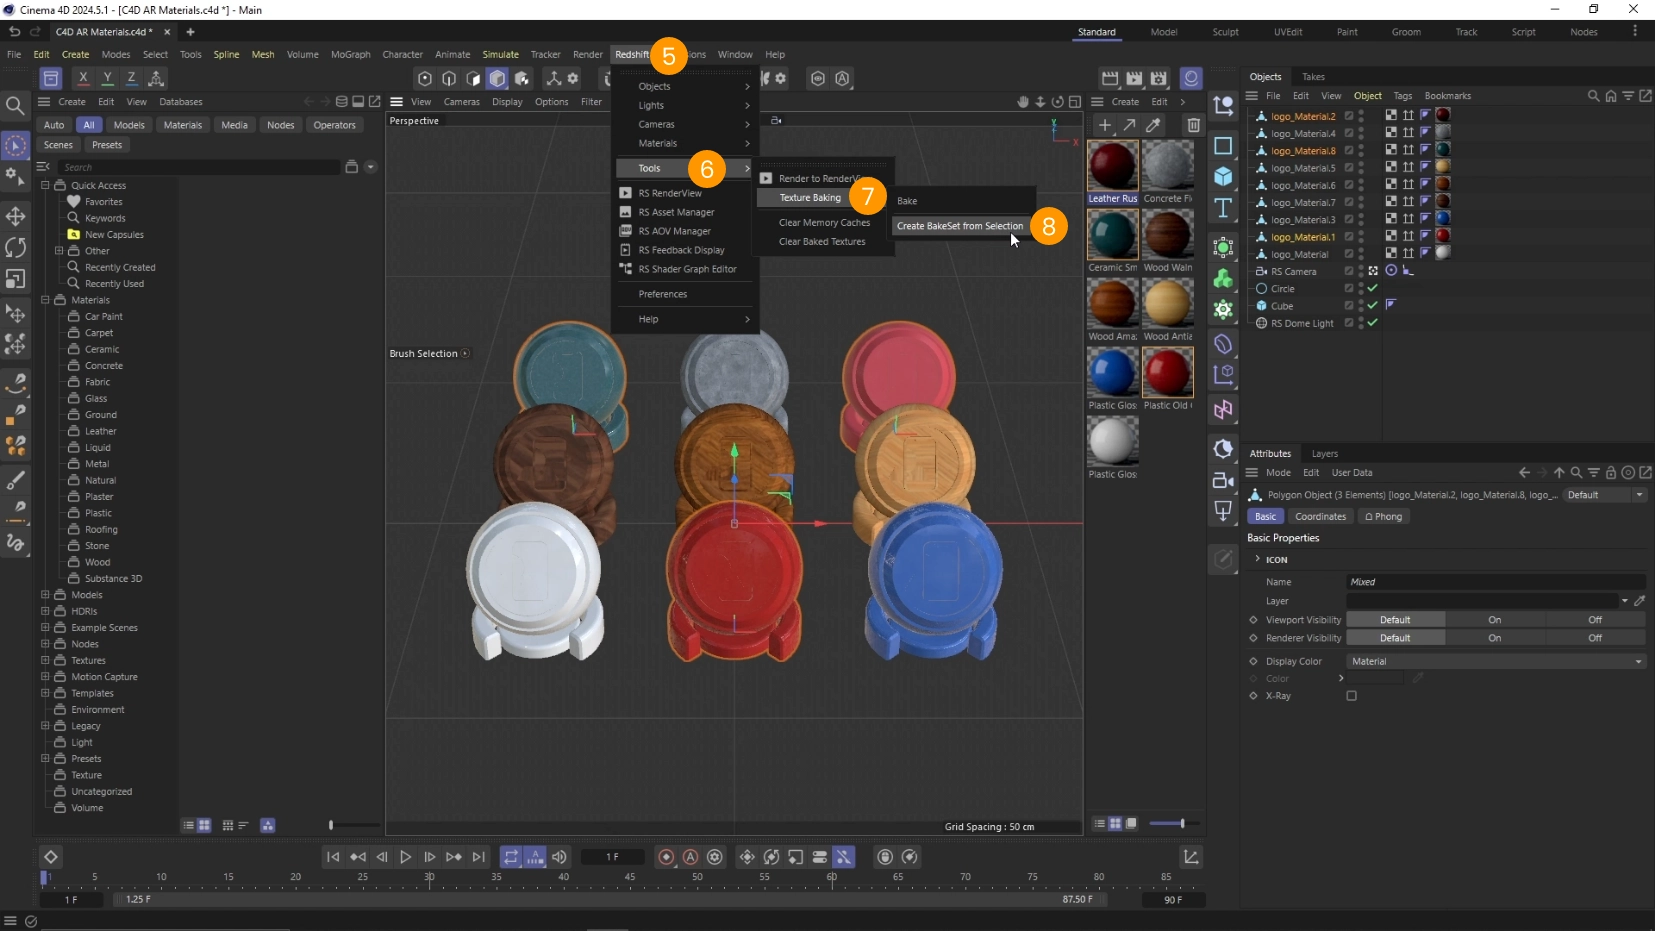
- Notice the new object RS BakeSet 9
- Notice that the objects to bake were added to the list 10
- Adjust the resolution of the texture if necessary 11
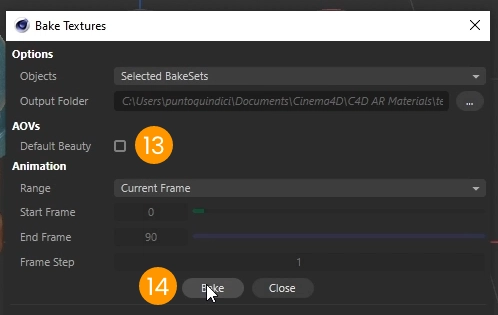
- Click Bake 12
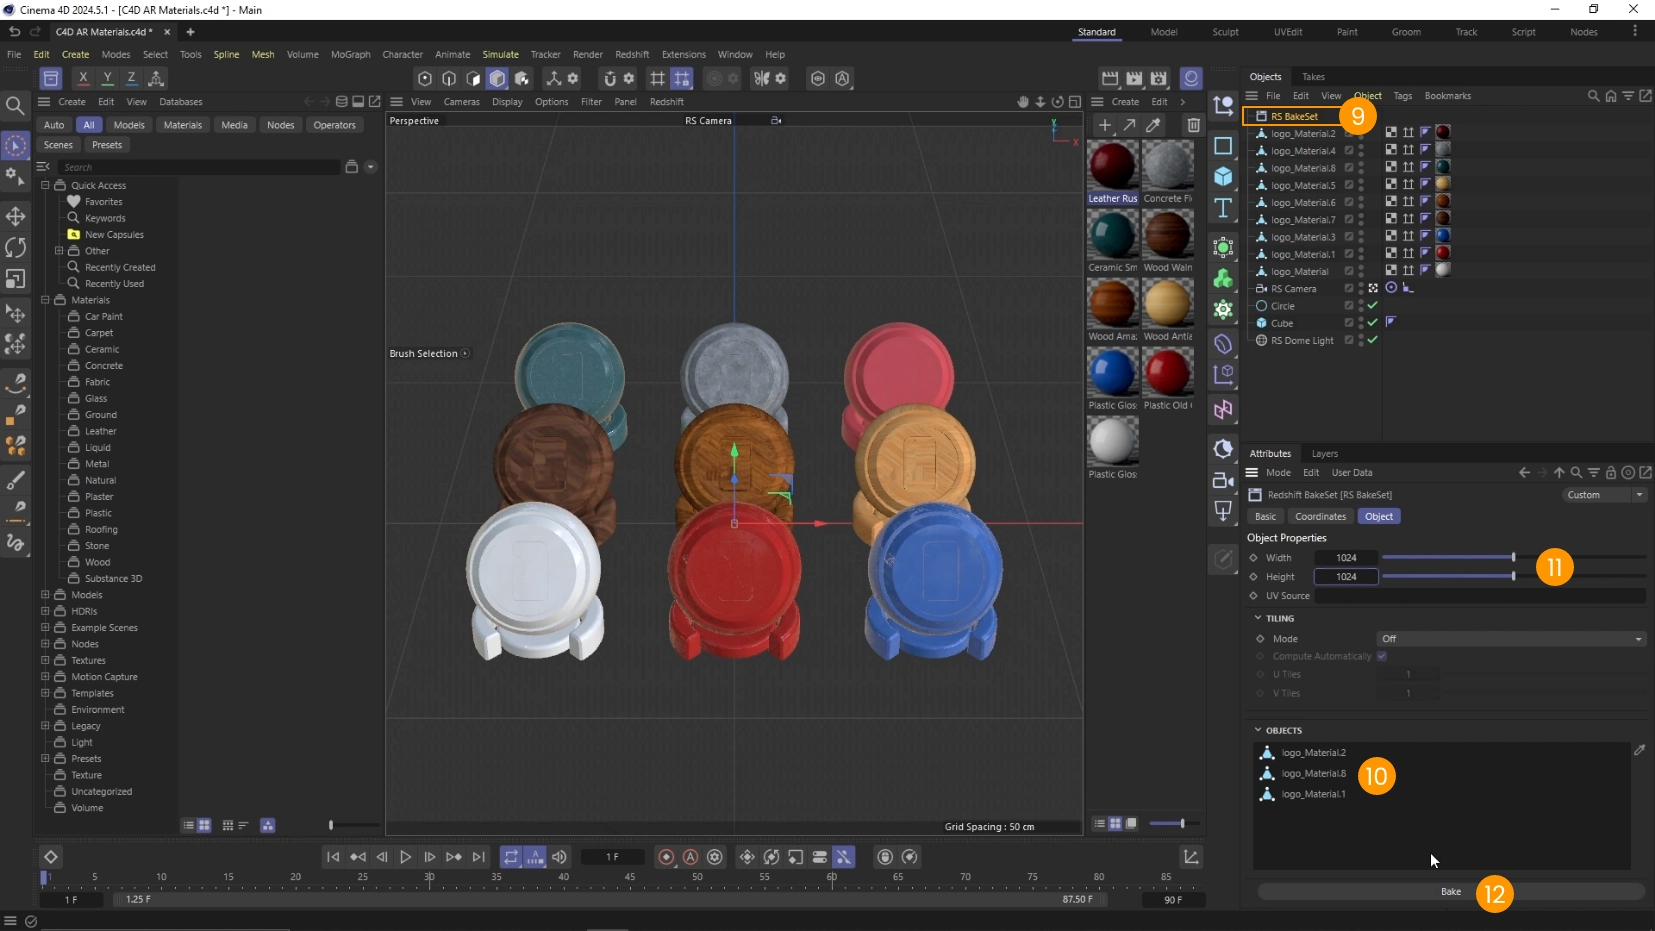
- Disable Default Beauty 13
- Click on Bake 14
After the processing is completed you will find the baked textures. In our case here are the base color textures for the ceramic, scratched plastic and leather objects.
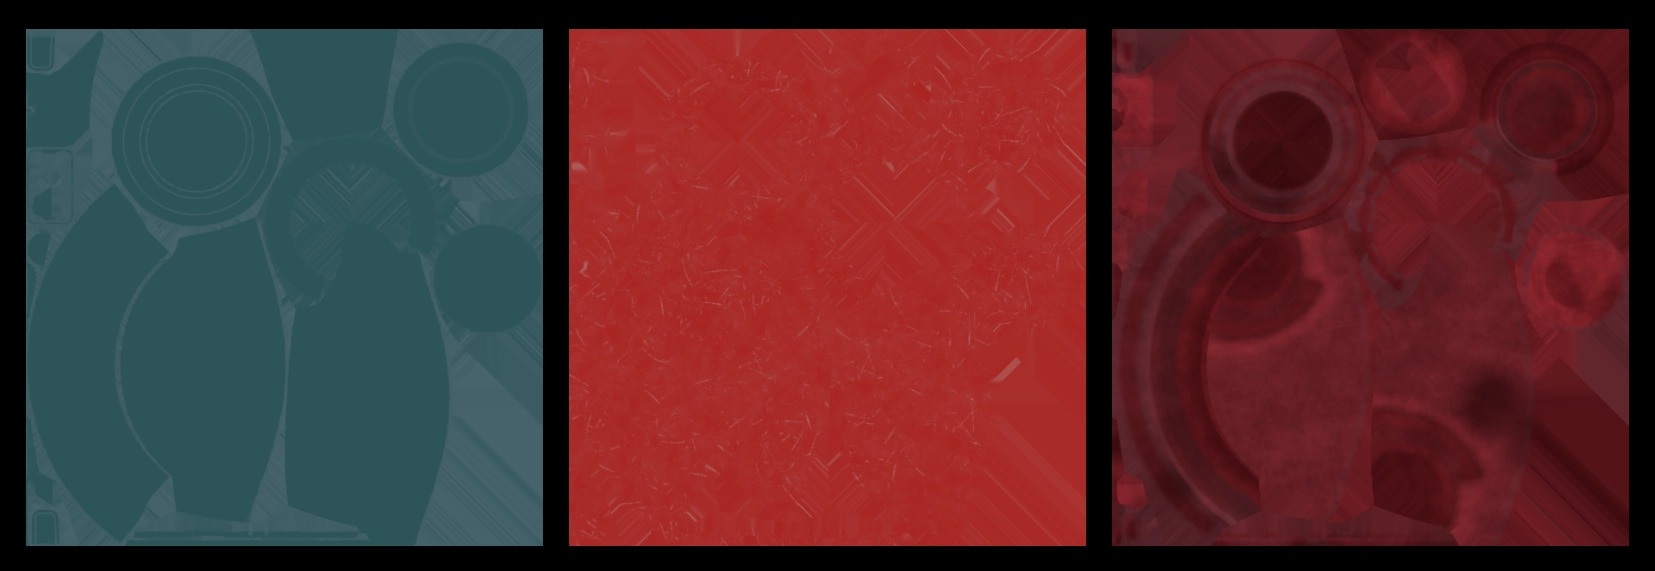
Baking is particularly useful for achieving effects such as scratches, roughness, or subtle details that are hard to replicate with automatic export processes.
Apply the baked texture
To apply the baked texture in My AR Studio:
-
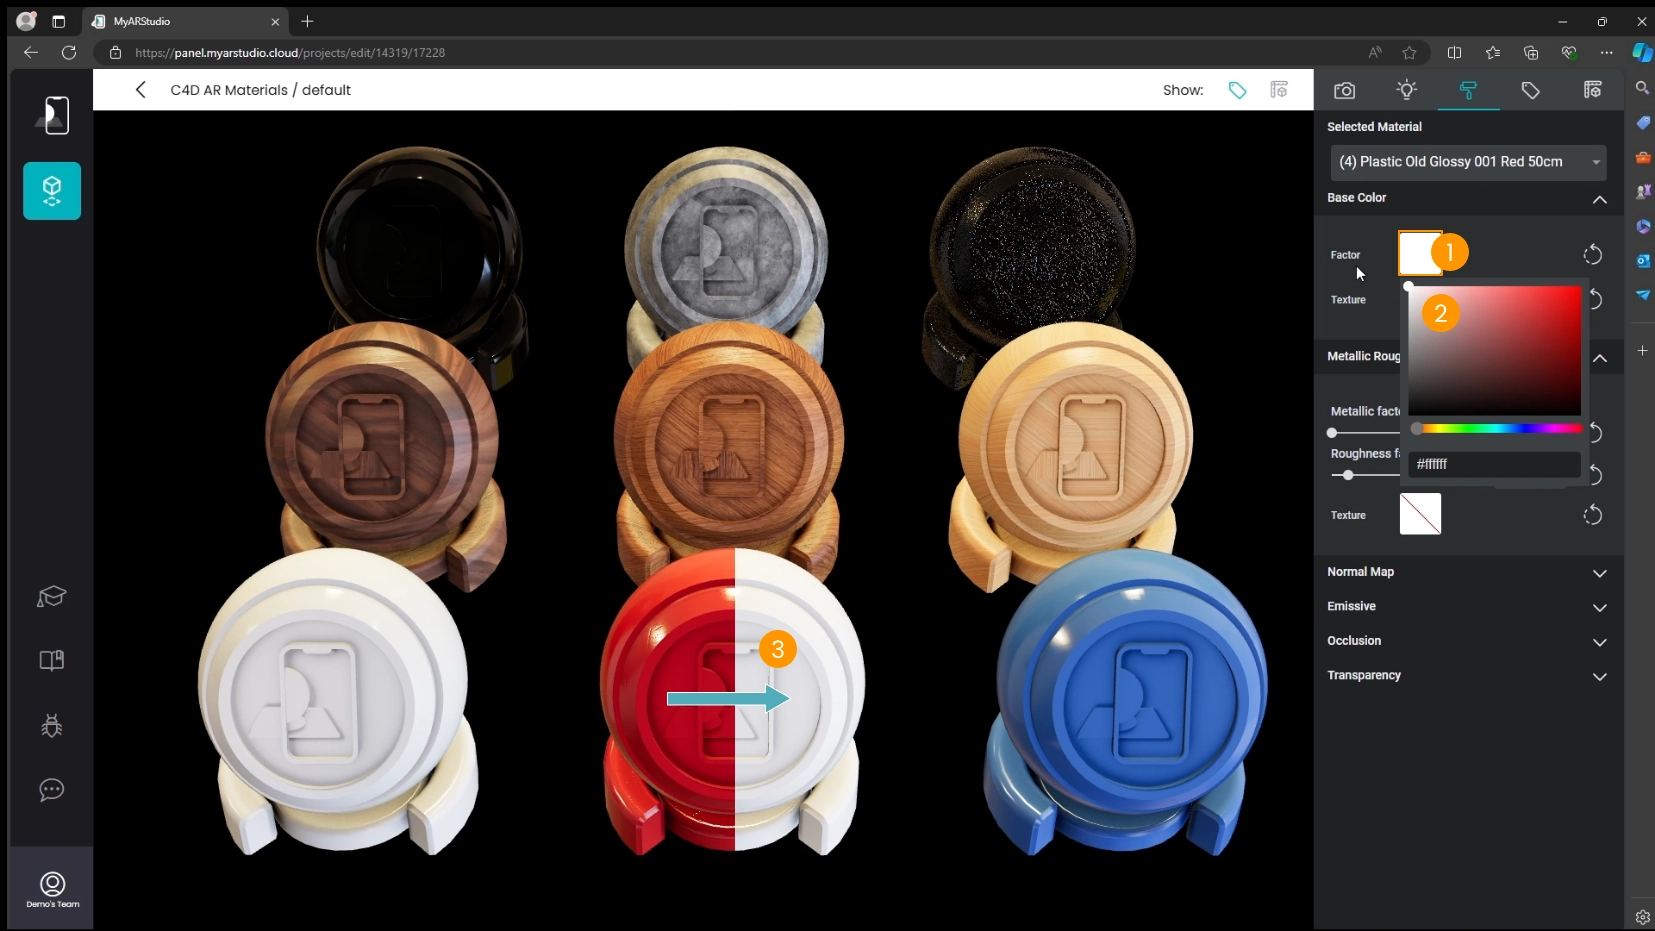
Locate the Base Color section and click on the Factor preview 1
-
Set the color to white 2
-
Notice the object changes color 3
-
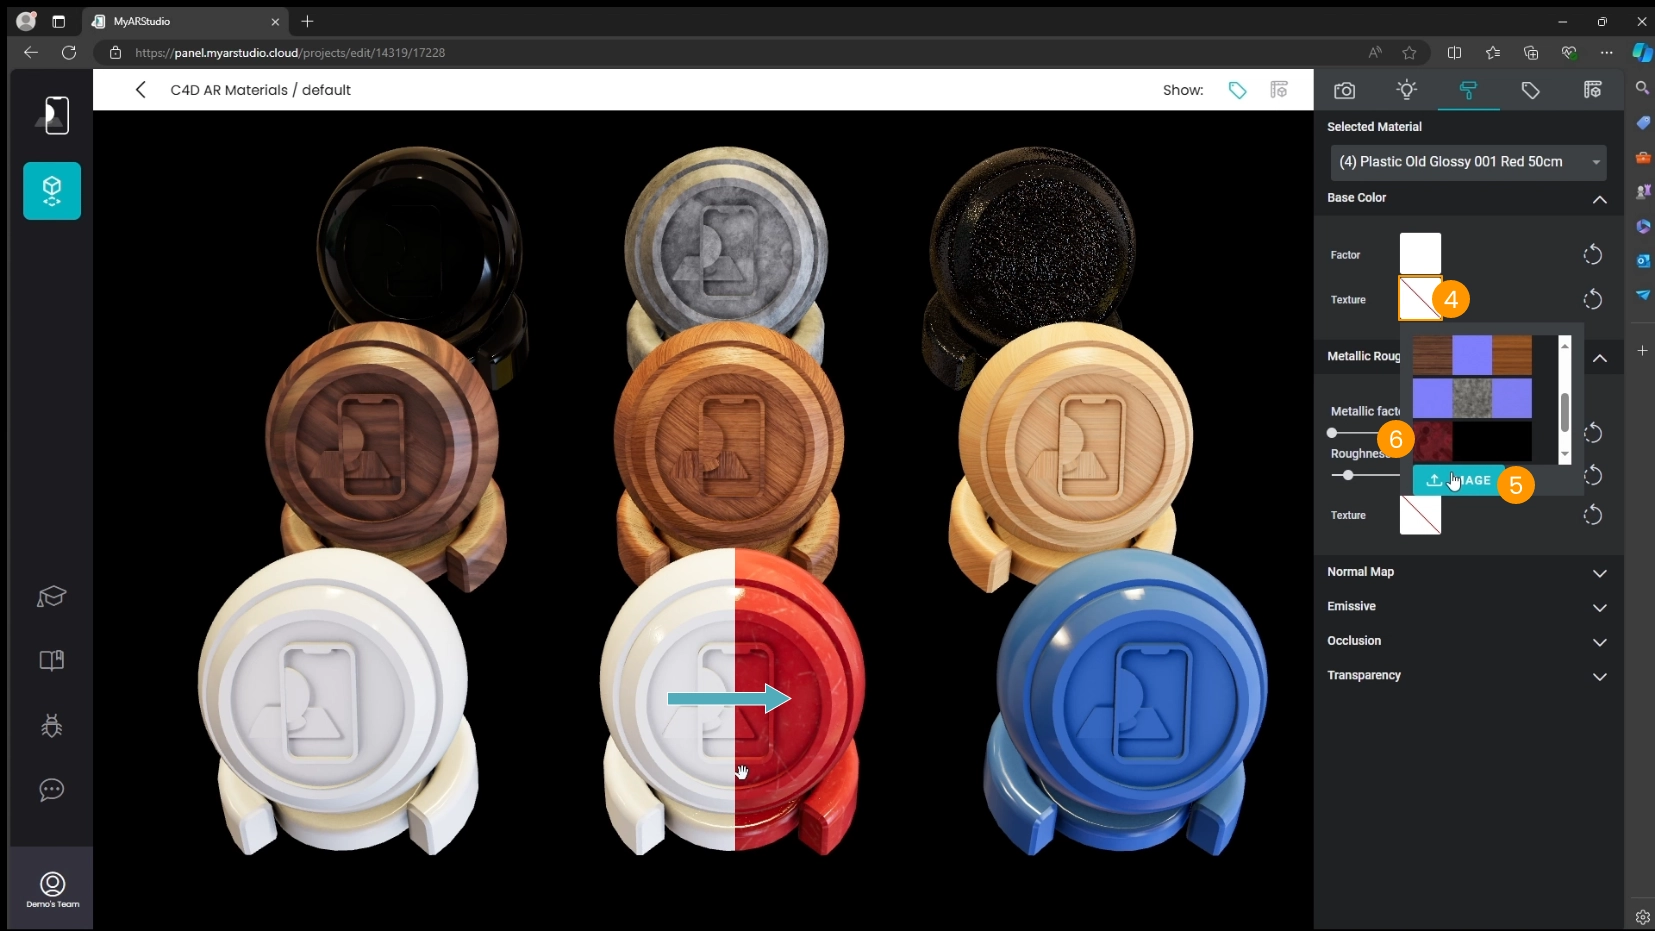
Click on the Texture preview 4
-
Click on IMAGE and upload the baked texture
-
If you need to re-use the texture multiple times you will find it in the textures list 6.
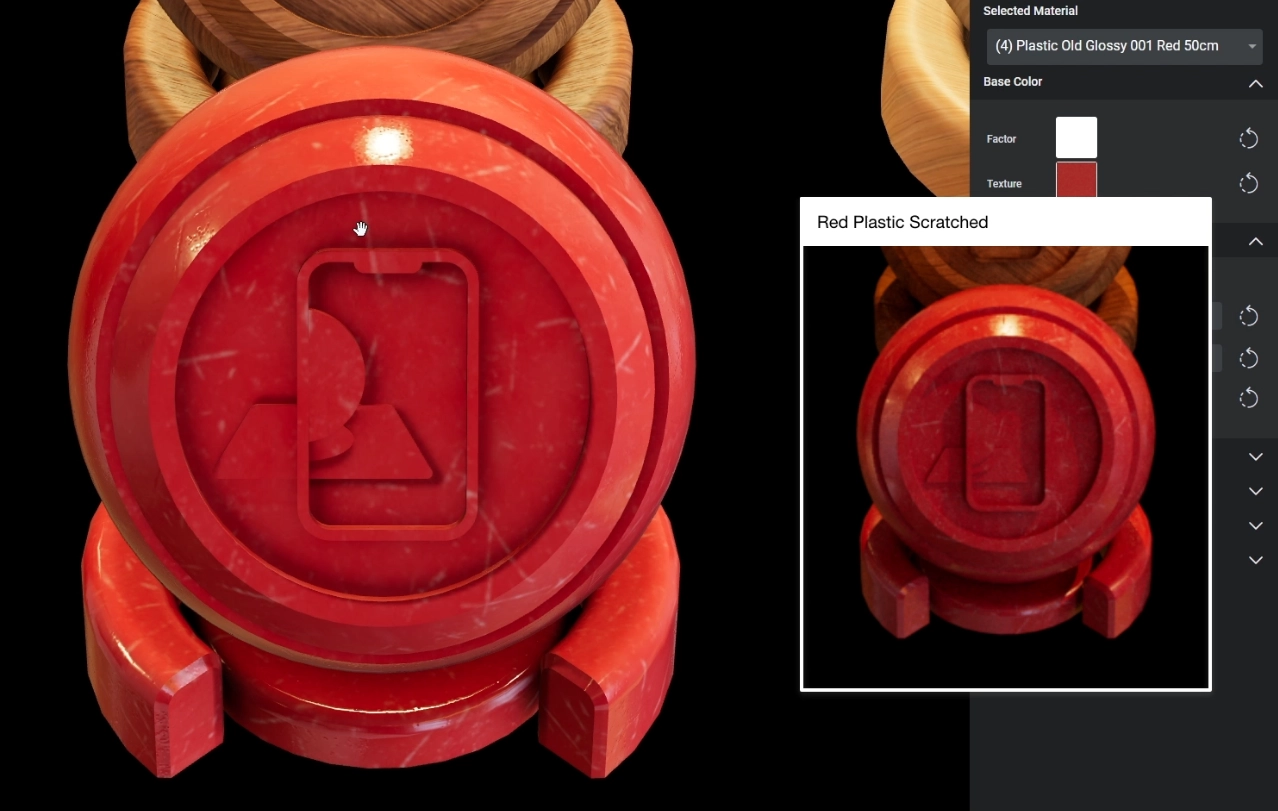
Here is the final result for the Scratched plastic material: My AR Studio on the left, Cinema 4D original render on the right.
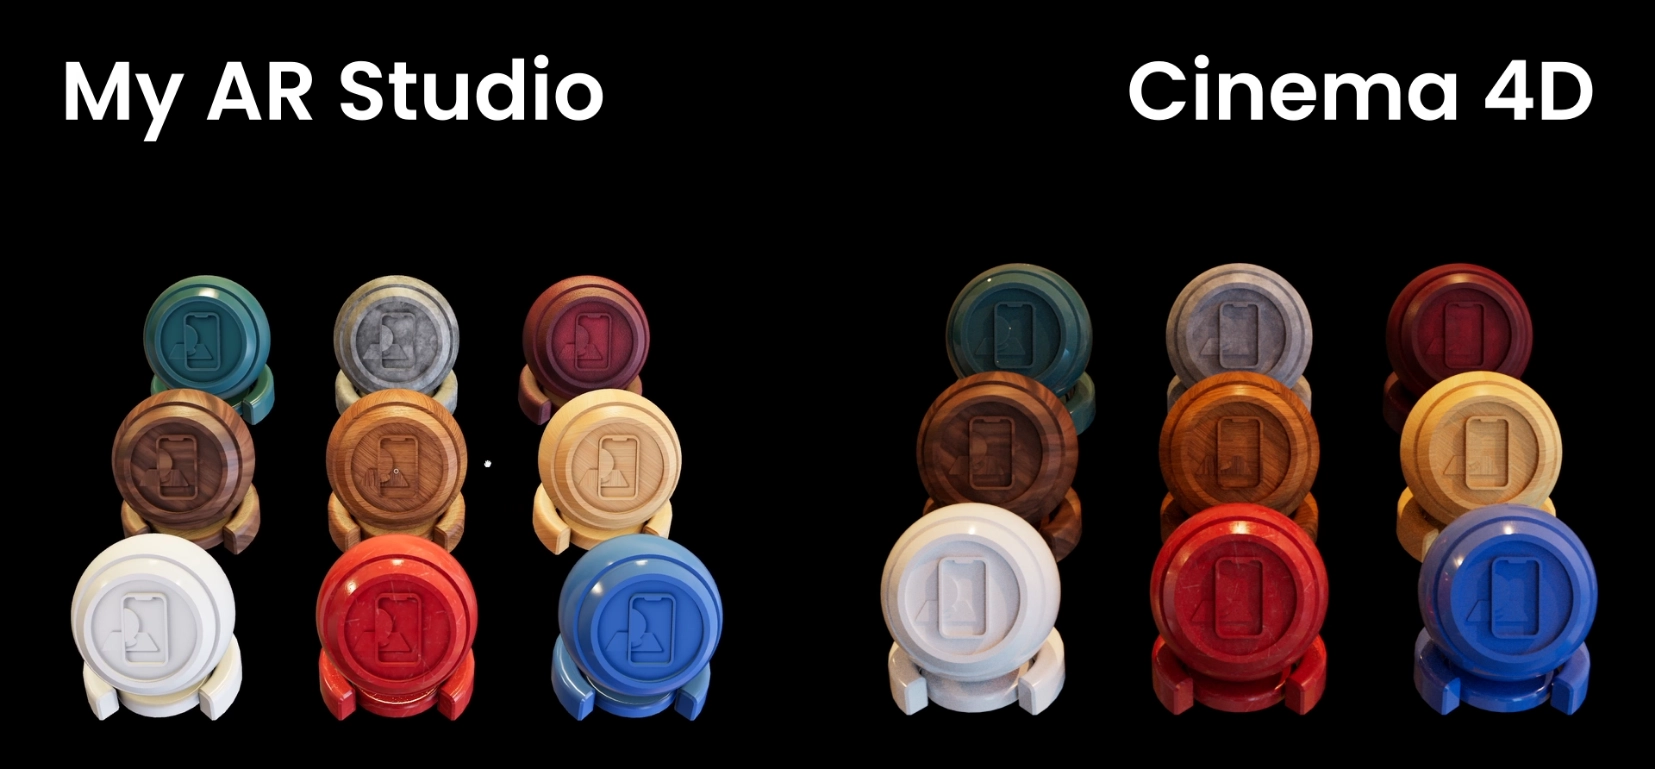
Final look of the materials chessboard 1
Here is the final result for the first batch. As you can see, with some adjustments we can preserve the appearance of the objects from Cinema 4D to the web and AR rendering.
Metals, Transparency, Displacement
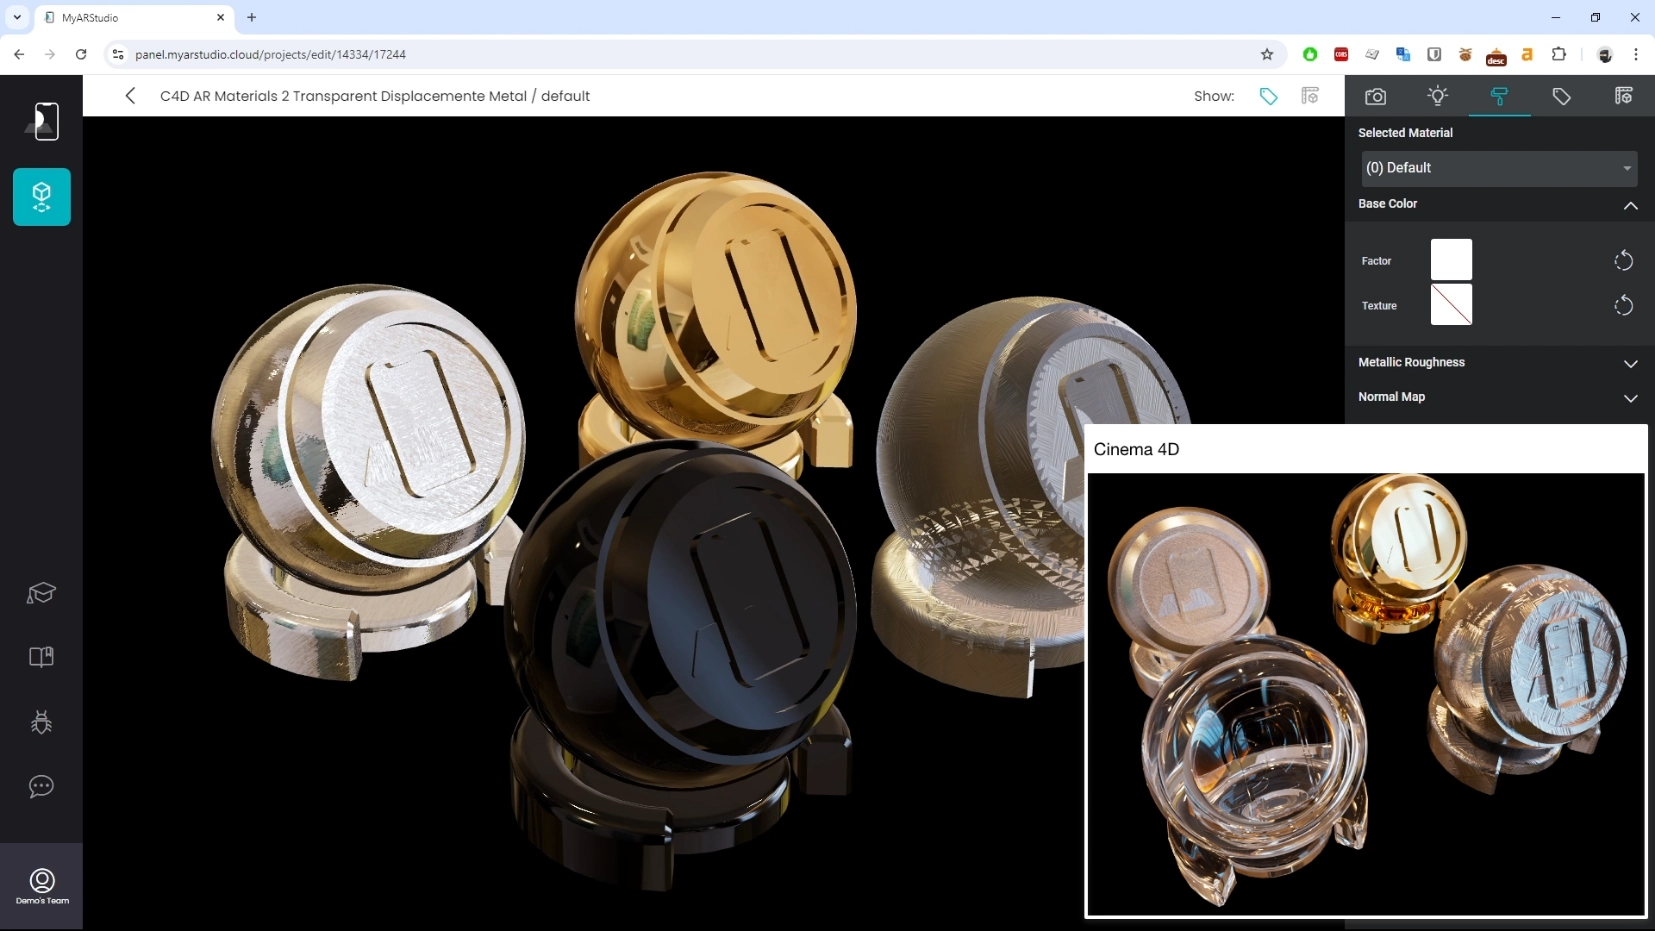
In the second batch we consider Metals and materials with transparency and displacement.
As you can see the glass sphere and the material with displacement need to be fixed.
Transparent Materials
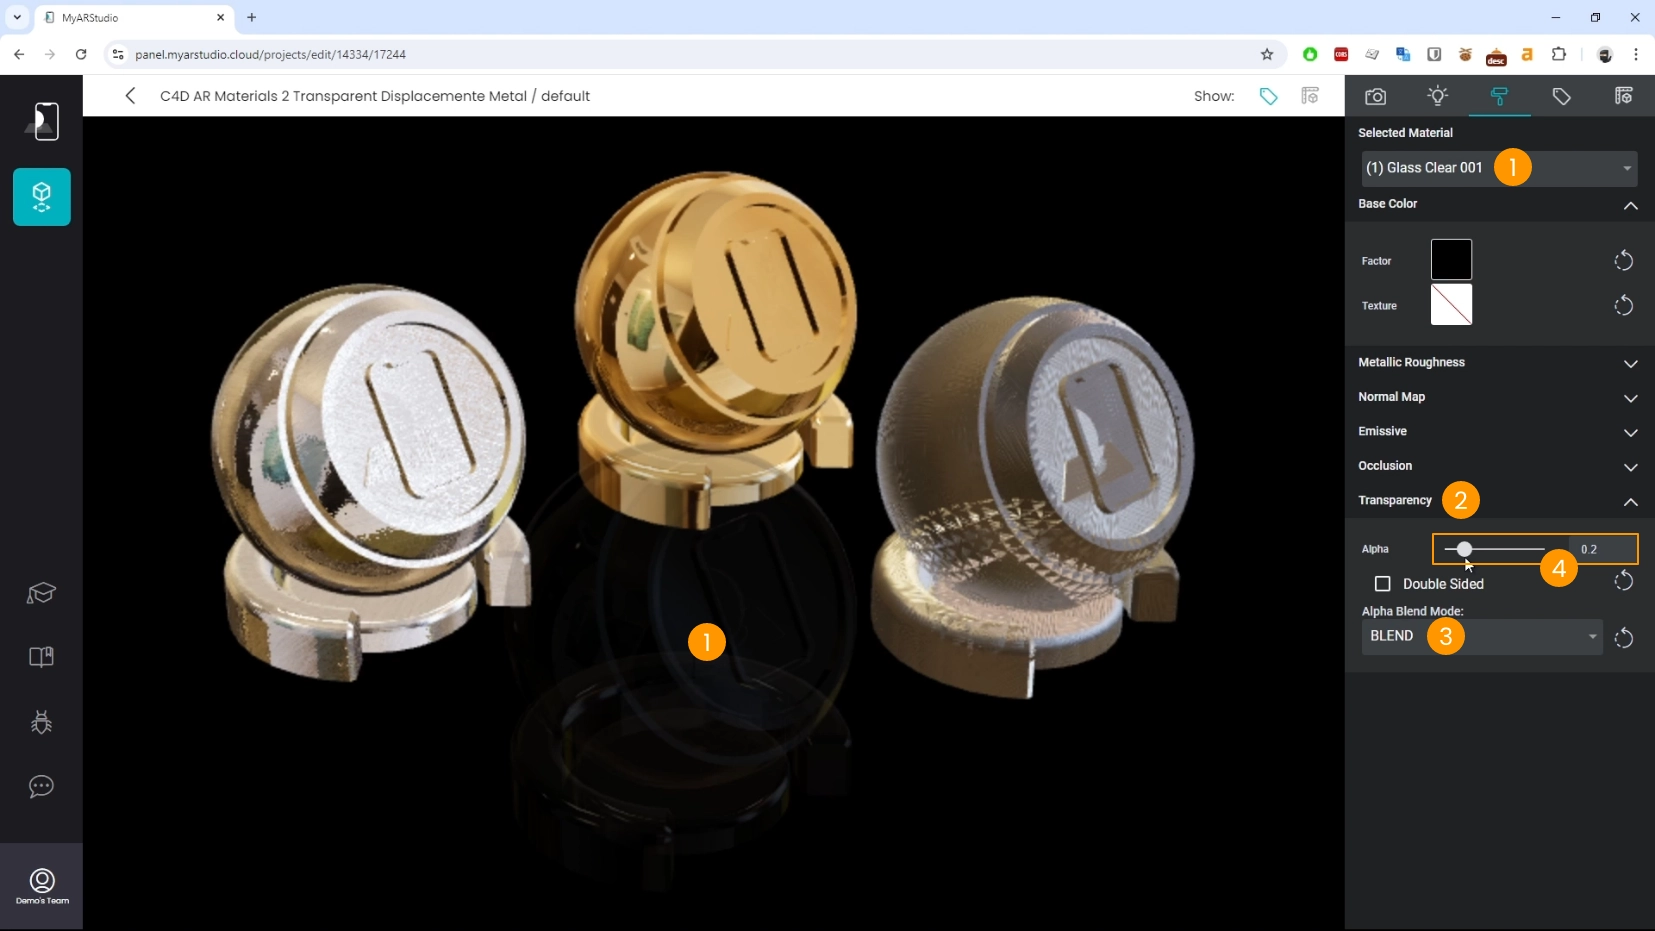
Transparent materials, like glass, often don't export correctly. You may need to rebuild these materials in My AR Studio.
Here's how to do it:
- Select the transparent material 1
- Locate the Transparency section 2
- Set Alpha Blend Mode to Blend 3
- Adjust the Alpha value. 4
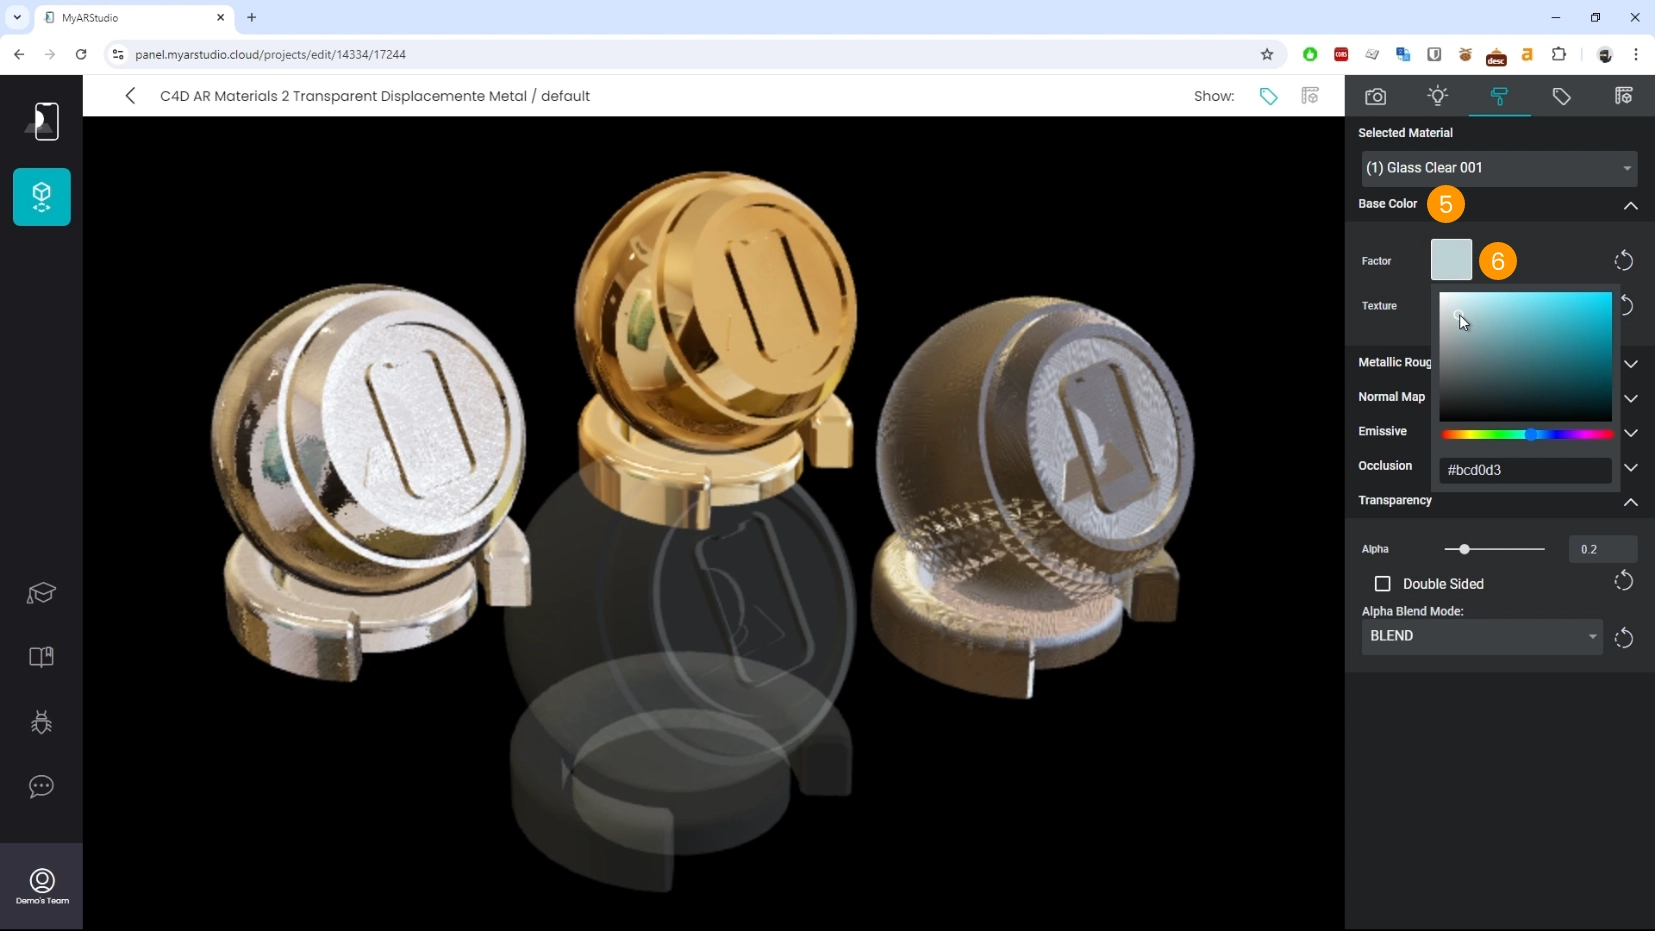
- Locate the Base Color section 5
- Set the Factor to a subtle blue tint for a more realistic look. 6
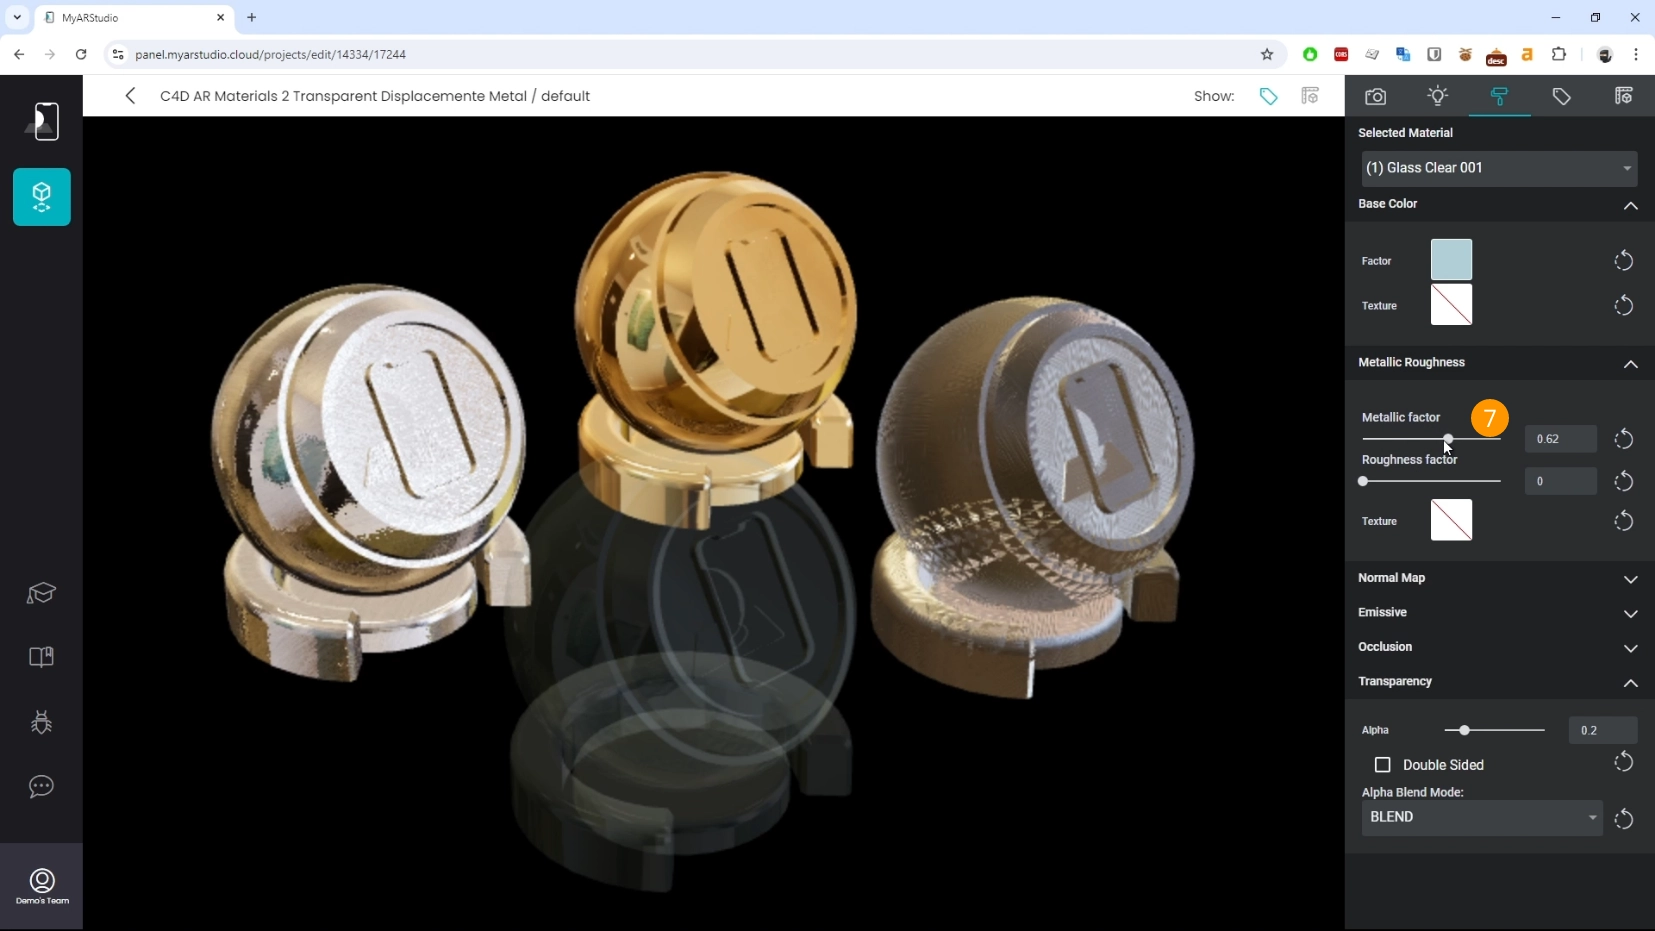
- Adjust the metallic factor to enhance the reflections 7
Displacement
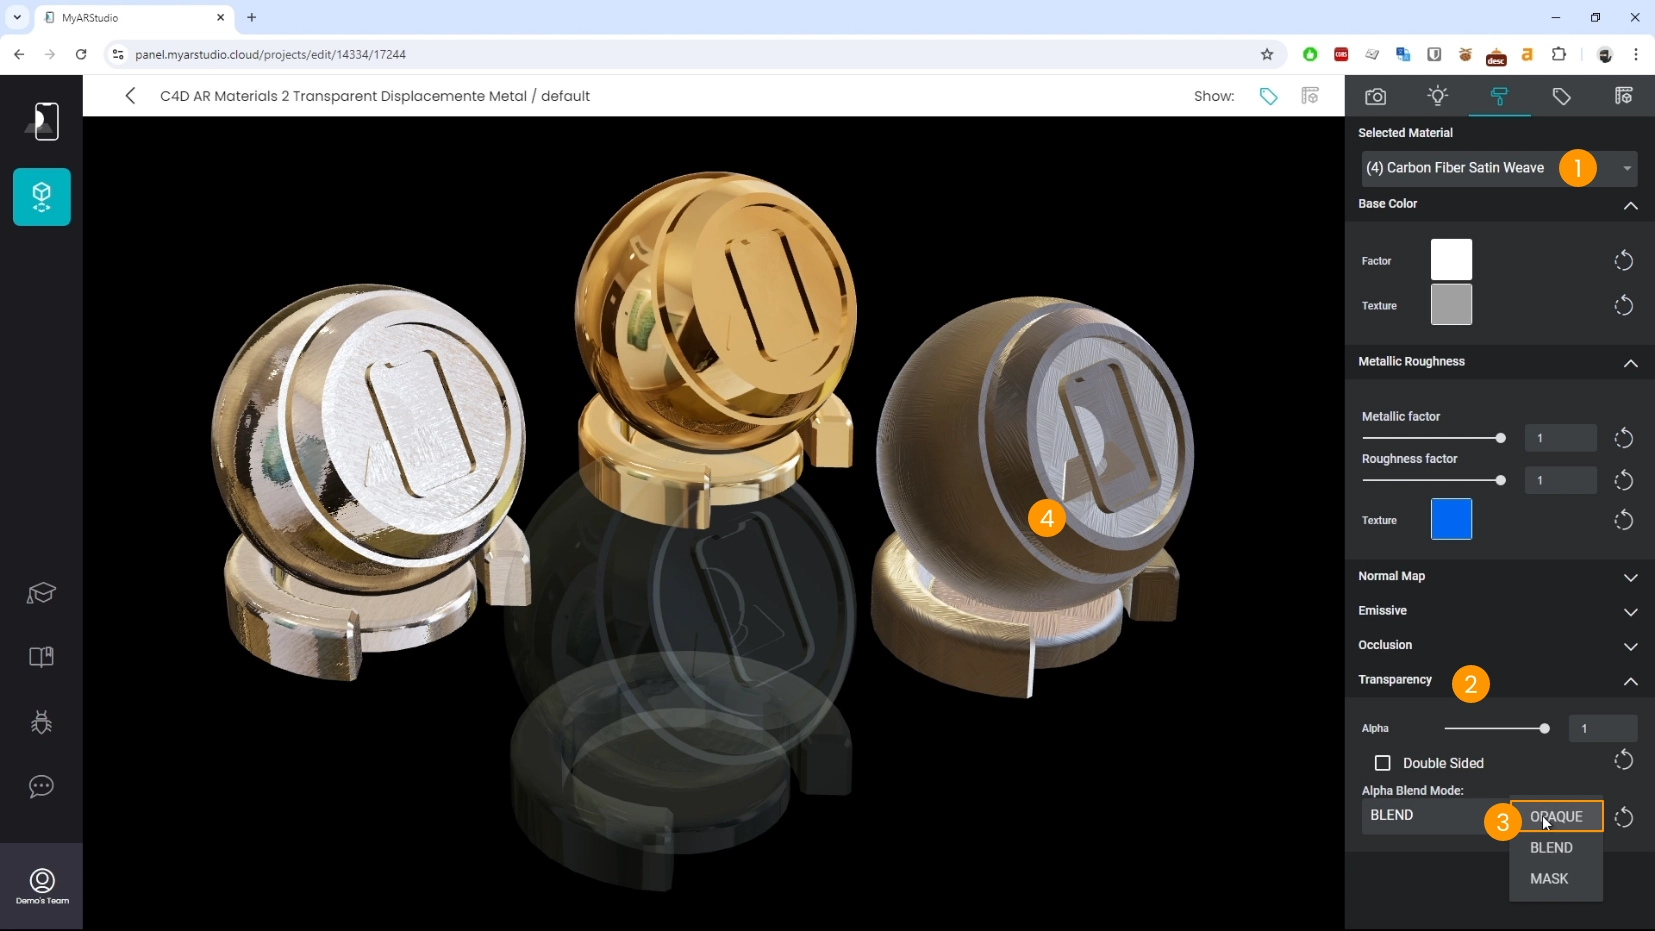
Materials with displacement are not fully supported in My AR Studio but you can preserve the other properties of the materials. These materials may be exported with issues, for example with some polygons appearing transparent. Here's how to fix it:
- Select the material 1
- Locate the Transparency section 2
- Set the Alpha Blend Mode to Opaque 3
- The object will be shown as solid and opaque 4.
Metals
Metal materials usually export correctly but can be fine-tuned by deactivating auto-generated metallic and roughness textures and adjusting these parameters manually.
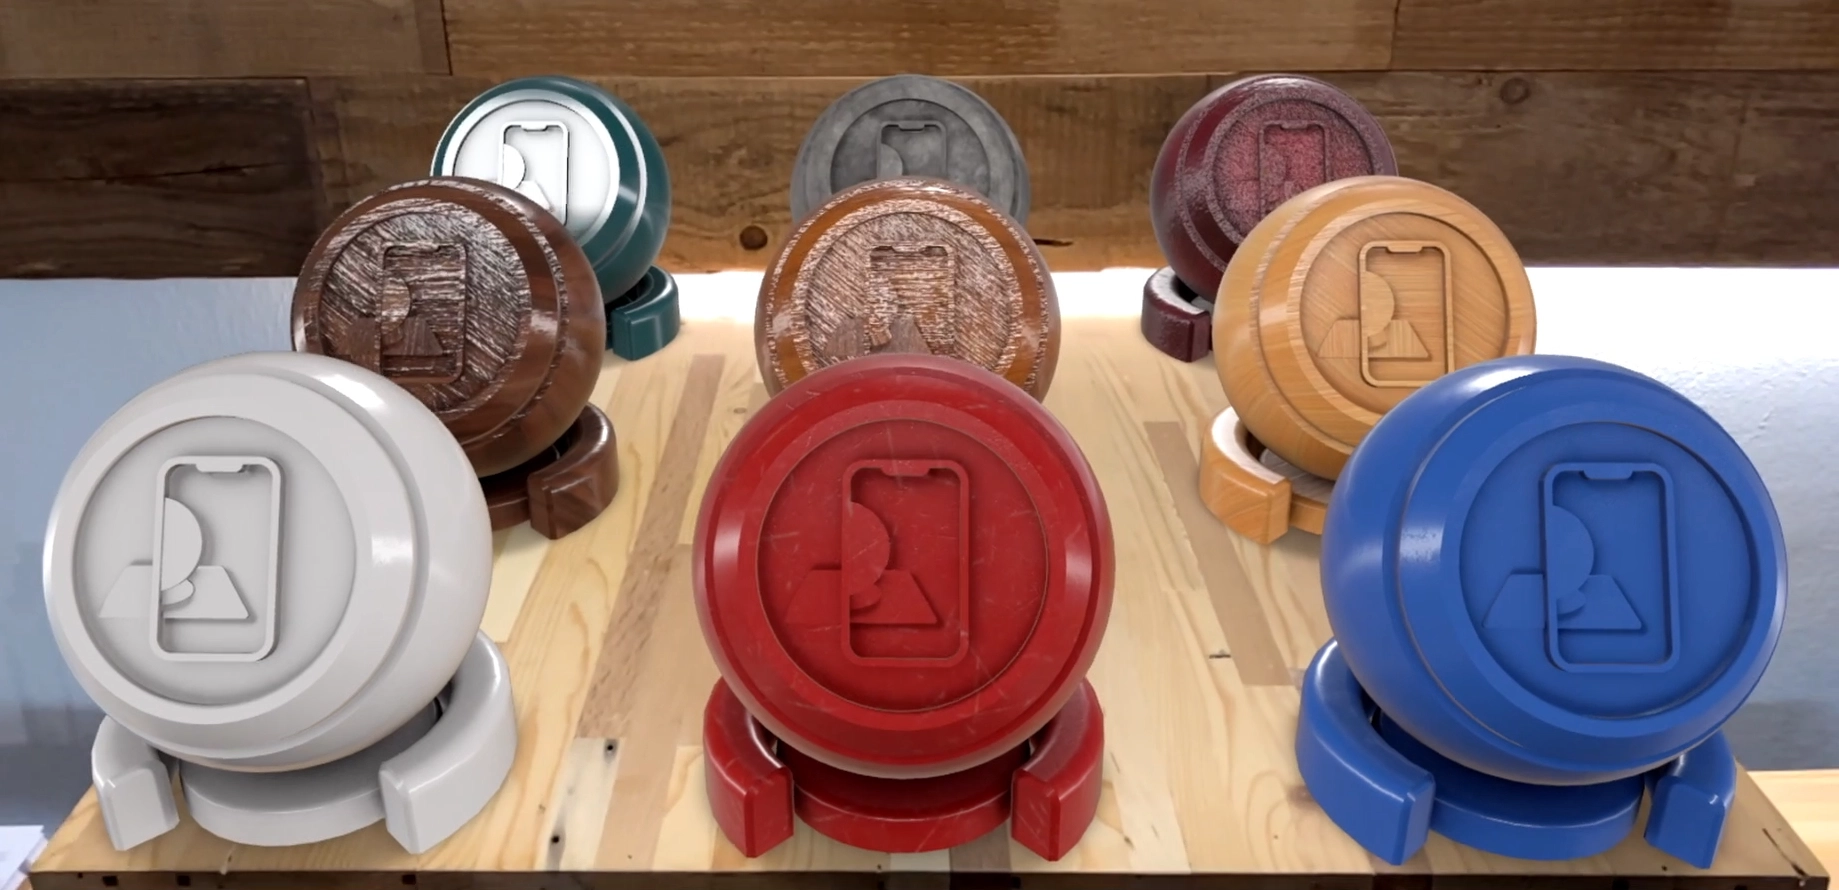
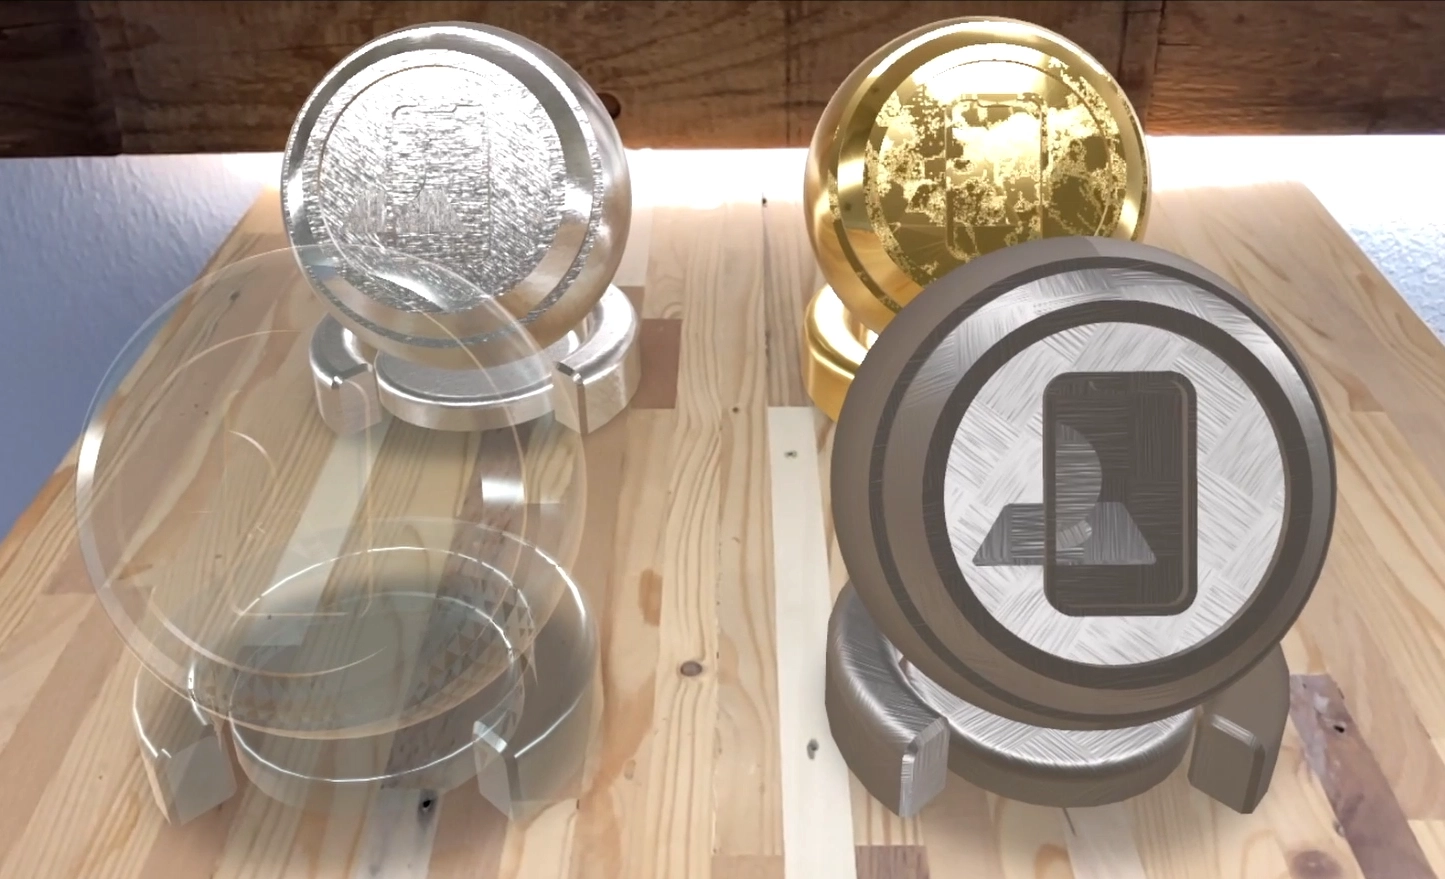
Final look of the materials chessboard 2
This is how the materials look in AR after the adjustments.
Final Considerations
With a few adjustments in lighting, ambient occlusion, and material settings, it's possible to closely replicate the Cinema 4D render in the web and AR environment. For certain complex materials, texture baking provides an essential solution for maintaining visual fidelity.
By following these techniques, you can efficiently transfer Cinema 4D materials into a web and AR friendly format, ensuring that textures, lighting, and surface details are preserved for optimal visual results on the web.